Oblivion:Fatback Cave
|
|||
|---|---|---|---|
| # of Zones | 3 | ||
| Occupants | |||
| Goblin Enemies (1 boss-level Goblin) |
|||
| Important Treasure | |||
| 1 boss-level Chest 01 | |||
| Console Location Code(s) | |||
| FatbackCaveExterior, FatbackCave, FatbackCave02, FatbackCave03 | |||
| Region | |||
| Heartlands | |||
| Location | |||
| South of the Imperial City, on City Isle near the shore of Lake Rumare | |||
Fatback Cave is a medium-sized cave south of the Imperial City containing goblins. It contains three zones: Fatback Cave, Fatback Great Chamber, and Fatback Deep Basins.
Notes[edit]
- This cave contains 89 Cairn Bolete plants and 71 Wisp Stalk plants.
Exterior[edit]
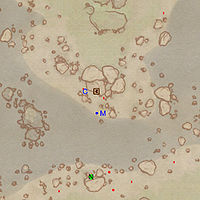
- The exterior is located at coordinates: Tamriel 9, 7
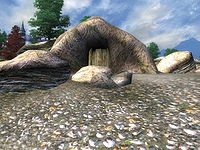
- This location's map marker (M on map) is named Fatback Cave (editor name FatbackCaveMapMarker). The entrance door is N of the marker, 40 feet away.
- 0-2 Goblins are near the entrance
- 2-6 Mud Crabs are near the entrance
- 1 Nirnroot is at location N on map
Zone 1: Fatback Cave[edit]
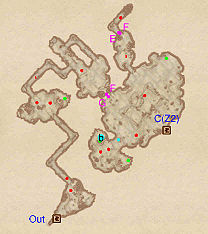
This is a fairly routine goblin cave. Proceed through the passages and rooms past five or six enemies to reach the main chamber. The entrance to the chamber is fitted with a Swinging Log trap at G, which may be set off by the enemies.
The main goblin lair appears to be the room southwest of the main chamber (with the bedroll at b). It is protected by a stockade, and contains the usual assortment of goblin odds and ends, including three dead rats, a dead skeleton, and a table with 14 gold coins (2 of which are underneath it) and an iron dagger lying in a pool of blood. A Swinging Mace trap (E) is in a small area northwest of the main chamber, but unless you like pumpkins, there's no real reason to go near it (only one pumpkin and one enemy are on the other side of the trap). A tunnel in the pit in the middle of the chamber leads to the door (C) to the next zone, Fatback Great Chamber.
Occupants:
- 4-5 Goblin Enemies (each 80% probability Goblin, 13% Rat, 7% Mud Crab)
- 6-7 Nuisance Animals
Treasure:
- 1 Chest 01
- 2 Chests 02 (1 locked)
- 1 Chest 03 (locked)
- The following ingredients will always be found: 1 Pumpkin
- The following weapons will always be found: 2 Iron Daggers
- The following plants will always be found: 55 Cairn Bolete plants and 39 Wisp Stalk plants
Traps:
- 2 Pressure Plate triggers at locations F on map
- 1 Swinging Log trap at G
- 1 Swinging Mace trap at E
Doors and Gates:
- There are two doors in/out of this zone
- 1 door (at Out) leads outside
- 1 door (at C) leads to the zone Fatback Great Chamber
Other:
- 1 bedroll at location b on map
Zone 2: Fatback Great Chamber[edit]
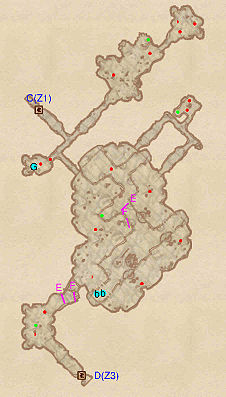
You enter this zone through door C. Turning to the right at the first intersection, the small room ahead to the southwest features a dead captive (G) behind a locked stick fence gate, which also encloses a living rat, a dead skeleton, a lettuce, and a potato. Returning to the passage and following the path to the southeast leads to the lower level of the large central chamber. Only one enemy is on the lower level, but you are likely to be detected by all of the enemies on the upper level who may make their way down to attack you. You do not need to go past the Falling Logs trap at F on the lower level. However, if you do, you will find a dead rat and a table with 12 gold coins and a rusty iron shortsword next to a cozy bonfire; two bedrolls (b) are past the bonfire.
The passage from the lower level to the upper level is to the northeast, accessed from the first left-hand turn after initially entering the chamber. On the upper level, wooden planks (none of which are traps) allow you to proceed clockwise around the chamber. The second Falling Logs trap, at the southwest exit from the chamber, is conspicuously placed on top of a ramshackle assembly of boards. Beyond the trap is the door (D) to the final zone, Fatback Deep Basins.
Occupants:
Treasure:
- 2 Chests 01
- 1 Chest 02 (locked)
- 1 Chest 04
- The following ingredients will always be found: 1 Lettuce and 1 Potato
- The following plants will always be found: 16 Cairn Bolete plants and 32 Wisp Stalk plants
Traps:
- 2 Falling Logs traps at locations F on map
- 2 Tripwire triggers at E
Doors and Gates:
- There are two doors in/out of this zone
- 1 door (at C) leads to the zone Fatback Cave
- 1 door (at D) leads to the zone Fatback Deep Basins
Other:
- 1 Dead Captive (10% chance enchanted jewelry) at location G on map
- 2 bedrolls at b
Zone 3: Fatback Deep Basins[edit]
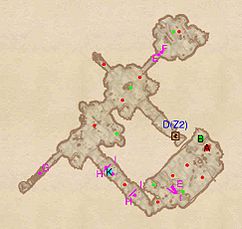
You enter and exit this zone through door D. To reach the boss chest (B) and boss-level goblin (A), you will need to circle counterclockwise through most of the zone to a point just east of where you entered at D. Along the way are several traps activated by a series of Tripwire triggers (I), one of which appears to have killed a previous treasure hunter (K).
Occupants:
- 1 boss-level Goblin at location A on map
- 4 Goblin Enemies (each 80% probability Goblin, 13% Rat, 7% Mud Crab)
- 6 Nuisance Animals
Treasure:
- 1 boss-level Chest 01 (Goblin variety; locked) at location B on map
- 2 Chests 01
- 2 Chests 02 (1 locked)
- 1 Chest 03
- The following plants will always be found: 18 Cairn Bolete plants
Traps:
- 1 Cave In trap at location G on map
- 1 Pressure Plate trigger at F
- 2 Swinging Log traps at H
- 4 Swinging Mace traps at E
- 3 Tripwire triggers at I
Doors and Gates:
- There is one door (at D) in/out of this zone, leading to the zone Fatback Great Chamber
Other:
- 1 Dead Treasure Hunter (carries light armor, one weapon, unenchanted loot) at location K on map
