Oblivion:Crayfish Cave
| This place page is currently being rechecked as part of the Oblivion Remastered Project. The page is being checked in several stages to verify any changes due to the release of Oblivion Remastered. All users are welcome to make changes to the page. If you make a change that is relevant to the project, please update this template accordingly, and make sure you have observed the project guidelines. Details Walkthrough: not written Interior Remastered Images: not added |
|
|||
|---|---|---|---|
| # of Zones | 5 | ||
| Occupants | |||
| Monsters (3 boss-level Monsters) |
|||
| Important Treasure | |||
| 2 boss-level Chests 1 empty grand soul gem (see notes) |
|||
| Console Location Code(s) | |||
| CrayfishCaveExterior, CrayfishCave, CrayfishCave02, CrayfishCave03, CrayfishCave04, CrayfishCave05 | |||
| Region | |||
| Nibenay Basin | |||
| Location | |||
| East of the junction of the Reed and Corbolo Rivers | |||
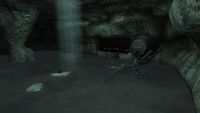
Crayfish Cave is a large cave south of Cheydinhal containing monsters. It contains five zones: Crayfish Cave, Crayfish Capillaries, Crayfish Vents, Crayfish Steep, and Crayfish Soggy Bottom.
Related Quests[edit]
- Vampire Cure: A long quest to gain the cure for vampirism.
Notes[edit]
- This cave contains 29 Cairn Bolete plants and 123 Wisp Stalk plants.
- One section of this cave, containing the Grand Soul Gem and one boss-level monster in Crayfish Steep, does not exist unless you have reached at least stage 30 of the Vampire Cure quest.
Exterior[edit]
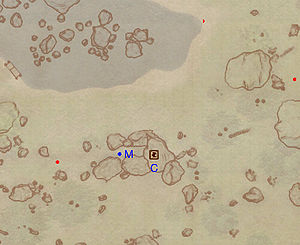
- The exterior is located at coordinates: Tamriel 31, 7.
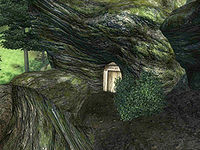
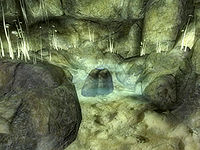
- This location's map marker (M on map) is named Crayfish Cave (editor name CrayfishCaveMapMarker). The entrance door is E of the marker, 40 feet away.
- 0-1 Mud Crab is near the entrance.
- 1 Wilderness Creature (Hills variety) is near the entrance.
- 1 Wilderness Creature (Valley variety) is near the entrance.
- The following plants can be found near the entrance: 1 Ginseng plant, 3 Lady's Smock plants, 1 Monkshood plant, and 3 Motherwort plants.
Zone 1: Crayfish Cave[edit]
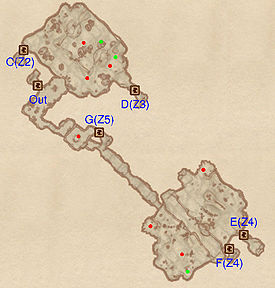
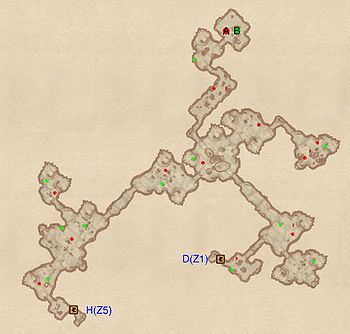
The first zone can be quite confusing, as it contains five doors to other zones in the cave, but only three of them are available from the ground level: C leads to Crayfish Capillaries, D leads to Crayfish Vents and F leads to Crayfish Steep. Basically, this entire zone functions as a nexus between the different zones, and the last two doors. high above ground level, are exits from other zones. Choose a direction from the entrance and explore; notably, there are two chests to be found in the large room to the north, both with a chance of enchanted equipment, and entrances C and D are in the same room.
The two remaining entrances represent easy routes back from other zones and are both initially inaccessible;
E: You will arrive through this door after visiting Crayfish Steep.
G: You arrive through this door after visiting Crayfish Soggy Bottom.
Occupants:
- 5 Monster Enemies (each 80% probability Monster, 20% Rat)
- 2 Nuisance Animals
Treasure:
- 1 Chest 01
- 2 Chests 02 (1 locked)
- The following plants will always be found: 3 Cairn Bolete plants and 10 Wisp Stalk plants
Doors and Gates:
- There are six doors in/out of this zone
- 1 door (at Out) leads outside
- 1 door (at C) leads to the zone Crayfish Capillaries
- 1 door (at D) leads to the zone Crayfish Vents
- 2 doors (at F and E) lead to the zone Crayfish Steep
- 1 door (at G) leads to the zone Crayfish Soggy Bottom
Zone 2: Crayfish Capillaries[edit]
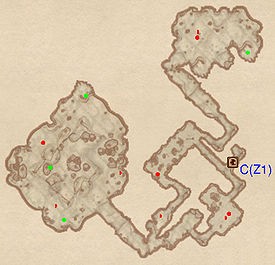
This is the only zone not connected to any of the other zones. The central part of the level consists of two identical routes, dependent on whether you head left or right as soon as you emerge from door C; you may find fewer enemies if you head right. The northern room contains up to two enemies and a minor loot chest while the western one up to three enemies and three minor loot chests.
Occupants:
Treasure:
- 1 Chest 02 (locked)
- 2 Chests 03
- 1 Chest 04
- The following plants will always be found: 1 Cairn Bolete plant and 21 Wisp Stalk plants
Doors and Gates:
- There is one door (at C) in/out of this zone, leading to the zone Crayfish Cave
Zone 3: Crayfish Vents[edit]
Be prepared as you arrive from door D, as you may have to immediately face an enemy. Look for a chest in an alcove to the right of the entrance. Proceed to the large room which serves as a three-way junction; there's a minor loot chest hidden in a barrel in the southeastern room, and another in the northwestern corner of the larger room (almost concealed by some Cairn Bolete plants).
Heading northeast will lead to a minor loot chest, but may entail simultaneously fighting up to three enemies. Heading northwest will lead you to a minor loot chest and a small room with a skeleton laid on a rock, torches burning above it. The boss chest (B) is found here, and so is a boss-level monster (A). Head southwest and battle your way to door H to Crayfish Soggy Bottom; picking up loot as you go. In particular, don't miss the small room to the northwest.
Occupants:
- 1 boss-level Monster at location A on map
- 1 Monster
- 4-8 Monster Enemies (each 80% probability Monster, 20% Rat)
- 5 Nuisance Animals
Treasure:
- 1 boss-level Chest (Monster variety) at location B on map
- 2 Chests 01 (both locked)
- 3 Chests 02
- 4 Chests 03
- 2 Chests 04
- The following plants will always be found: 14 Cairn Bolete plants and 22 Wisp Stalk plants.
Doors and Gates:
- There are two doors in/out of this zone
- 1 door (at D) leads to the zone Crayfish Cave
- 1 door (at H) leads to the zone Crayfish Soggy Bottom
Zone 4: Crayfish Steep[edit]
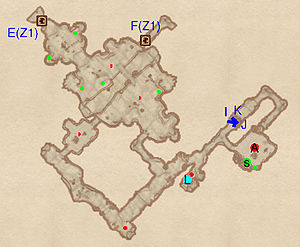
From F, you will emerge in knee-deep water in the lower, narrow level of the zone's main room; take care to avoid alerting two possible enemies on the upper level. Emerge from the water and follow the tunnels up until you reach an intersection. Head north and make a u-turn to enter a small room containing an enemy and the remains of a less-fortunate adventurer (L). Further ahead is a sun-lit room with an enemy guarding a minor loot chest.
- Note: If you have started the Vampire Cure quest and talked to Melisande about soul gems, three large rocks (I, K and J) will suddenly appear within the cave, but will retreat when approached, revealing a path. Follow it around and you will emerge in a room with a boss-level monster at A and an empty Grand Soul Gem at S. This is an entirely different version of the room you can access without the quest enabled.
Backtrack to the intersection and head left to reach the upper level of the main room. Loot the various chests and cross the rock bridge to access door E to Crayfish Cave.
Occupants:
- 1 boss-level Monster at location A on map (only if Vampire Cure quest has been started, see above).
- 0-1 Monster
- 3-5 Monster Enemies (each 80% probability Monster, 20% Rat)
Treasure:
- 1 empty grand soul gem at location s on map (only if Vampire Cure quest has been started)
- 3 Chests 01 (2 locked)
- 1 Chest 02
- 1 Chest 03
- 1 Chest 04
- The following plants will always be found: 3 Cairn Bolete plants and 43 Wisp Stalk plants.
Doors and Gates:
- There are two doors (at E and F) in/out of this zone, both leading to the zone Crayfish Cave
- 3 Rock Walls (open when you approach) at I, J, and K (only if Vampire Cure quest has been started)
Other:
- 1 Dead Treasure Hunter (carries light armor, one weapon, unenchanted loot) at location L on map
Zone 5: Crayfish Soggy Bottom[edit]
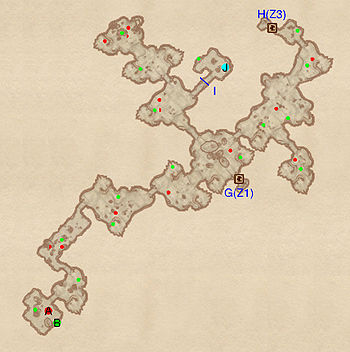
This last zone is basically one big treasure trove with over 16 treasure chests and a boss-level chest as an extra bonus. It appears more or less as one long trip through knee-deep water, starting from door H, with only one detour along the way. In particular, once you arrive at door G, head northwest to find four minor loot chests and up to five enemies guarding them. Unlocking the wooden door at I will lead you to an amusing scene: a chance to see a Goblin (J) dead from consuming a ridiculous amount of beer!
The rest of the zone is quite linear, with a fair amount of loot and enemies before you arrive at the small, well-concealed final room containing the boss chest (B) and the boss-level monster (A).
Occupants:
- 1 boss-level Monster at location A on map
- 1 Monster
- 4-7 Monster Enemies (each 80% probability Monster, 20% Rat)
- 5 Nuisance Animals
Treasure:
- 1 boss-level Chest (Monster variety; locked) at location B on map
- 3 Chests 01 (1 locked)
- 6 Chests 02 (1 locked)
- 4 Chests 03
- 3 Chests 04
- The following plants will always be found: 8 Cairn Bolete plants and 27 Wisp Stalk plants
Doors and Gates:
- There are two doors in/out of this zone
- 1 door (at G) leads to the zone Crayfish Cave
- 1 door (at H) leads to the zone Crayfish Vents
- 1 Wood Door at I (locked)
Other:
- 1 Dead Goblin (may carry a lockpick) at location J on map, surrounded by 18 beer bottles
