Oblivion:Fanacas
|
|||
|---|---|---|---|
| # of Zones | 1 | ||
| # of Welkynd Stones | 0 | ||
| # of Varla Stones | 0 | ||
| Occupants | |||
| Vampires (1 boss-level Vampire) |
|||
| Important Treasure | |||
| 1 Ayleid Statue 1 boss-level Ayleid Reliquary |
|||
| Console Location Code(s) | |||
| FanacasExterior, Fanacas | |||
| Region | |||
| Valus Mountains | |||
| Location | |||
| North of Cheydinhal, East of Lake Arrius | |||
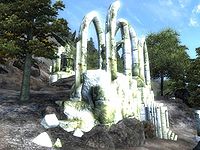
Fanacas is a small Ayleid ruin north of Cheydinhal containing vampires (quest-related). It contains only one zone, Fanacas.
Related Quests[edit]
- The Collector: Help Umbacano, a collector of ancient artifacts, recover the "Ten Ancestors", a set of ancient Ayleid statues.
Notes[edit]
- This ruin can be entered, fully explored and all items retrieved without starting the related quest.
- Standing on Dive Rock will add a map marker for Fanacas.
- Fanacas also appears in ESO.
Bugs[edit]
- The two Iron Gates at the entrance (F and the unlabeled one to the north) will only open the first time you step on the pressure plate for gate F. The gates will remain open for the duration of your first visit. However, if you return to Fanacas after the gates have reset to their default closed position, the pressure plate that originally opened the gates will no longer function. Completely exploring the dungeon at that point requires water walking or good Acrobatics skill.
The Unofficial Oblivion Patch, version 1.2.0, fixes this bug.
Exterior[edit]
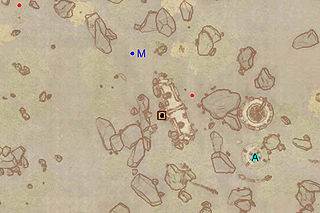
- The exterior is located at coordinates: Tamriel 31, 28
- This location's map marker (M on map) is named Fanacas (editor name FanacasMapMarker). The entrance door is SSE of the marker, 90 feet away.
- 1 Road Creature (Mountains variety) is near the entrance
- 1 Wilderness Creature (Mountains variety) is near the entrance
- The following plants can be found near the entrance: 55 Clouded Funnel Cap plants, 1 Milk Thistle plant, 20 Motherwort plants, and 10 Tinder Polypore plants
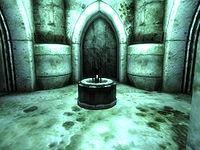
- 1 Ayleid Well is at location A on map
Zone 1: Fanacas[edit]
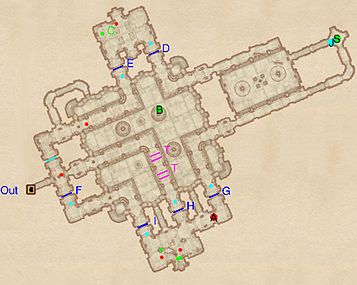
The Ayleid Statue is at the far east side of the dungeon (S on map). However, reaching the statue requires working your way through a minor maze of walkways, one-way gates, and water-filled rooms (both the main central room and the medium-sized eastern room are underwater). The other notable treasure, a boss chest (at B) is easy to miss, since it is perched on a column in the middle of the water.
The first two gates you pass (F and the unlabeled gate to the north) are both closed and are "opened elsewhere". In fact, the pressure plate for gate F (cyan dot on the south side of the gate) simultaneously opens both gates (see bugs). When you first enter, your only option is to proceed east to the central room.
The central room is filled with water, with several walkways across the water connecting the various side rooms. If you can walk on water, navigating through this room (and thus through the dungeon as a whole) is much easier: simply walk across the water from one walkway to the next (and make sure not to miss the boss chest at B as you walk past), ignoring the complex set of one-way gates. Alternatively, with sufficient Acrobatics skill it is possible to jump back out of the water onto any of the walkways.
Otherwise, it's necessary to go through the maze the developers put in place. The first priority is to reach the southernmost room (necessary in order to open the gate at F). There are three main options for how to get to the southern room:
- Walk along the central walkway in front of you, watching out for the four Falling Blade traps at T. This provides access to gate H, which can be opened by simply stepping on the pressure plate in front of the gate.
- Jump into the water to the left (north) of the walkway. This is probably the best option, since it allows you to avoid the traps and provides access to the boss chest at B. From there, swim to the south end of the room, where an underwater staircase allows you to emerge in the southern room.
- Jump into the water to the right (south) of the walkway. Again there is an underwater staircase that allows you to swim out into the southern room.
Once you are in the southern room (and have defeated any necessary enemies), you will be able to step on the pressure plate to open gate I, return through the passage to the south side of gate F, step on the pressure plate there, and open the two entryway gates.
From that point on, the rest of the dungeon is more straightforward. Go through the gate to the north, open gates E then D, and reach the eastern room (again waterfilled). Jump into the water and swim to the underwater staircase on the east side of the room. The staircase brings you at last to the Ayleid Statue. You can return to the front door through the southern passage, opening gate G along the way. Be prepared, however, for the boss vampire (A) who will have appeared on the other side of gate G (even if you had previously cleared out the room).
Occupants:
- 1 boss-level Vampire (50% chance Vampire Matriarch, 50% chance Vampire Patriarch) at location A on map. The boss is not activated until you retrieve the Ayleid Statue; specifically the boss is activated when you pass an invisible trigger point at J on the map. On subsequent visits to the dungeon, the boss will respawn and will be found at A as soon as you enter the dungeon.
- 1 Vampire Beast (level-dependent Rat, Wolf, or Timber Wolf)
- 4 Vampires
Treasure:
- 1 Ayleid Statue at location S on map
- 1 boss-level Ayleid Reliquary (Vampire variety; locked) at B
- 3 Ayleid Casks 01 (1 locked)
- 3 Coffins 01
- 1 Coffin 02
- Four of these containers are clustered near location C: 2 Ayleid Casks 01 (1 locked) and 2 Coffins 01
Traps:
- 4 Falling Blade traps at locations T on map
Doors and Gates:
- There is one door (at Out) in/out of this zone, leading outside
- 6 Iron Gates (opened remotely) at D, E, F, G, H, and I. Each of these doors is opened by an adjacent pressure plate (the small cyan dots on the map). Since the gates only have pressure plates on one side, the gates can only be opened from that side.


