Battlespire:Level 7

Contents
- 1 Quick Walkthrough
- 2 Detailed Walkthrough
- 2.1 Point A - Entry: Small Island One
- 2.2 Point B - Satellite
- 2.3 Point C - Seducer Isle
- 2.4 Point D - Satellite
- 2.5 Point E
- 2.6 Point F - Satellite Island
- 2.7 Point G - Satellite Island
- 2.8 Point H - Pier One & Drawbridge
- 2.9 Point I - Pier Two & Drawbridge & Ballista
- 2.10 Point J
- 2.11 Point K - Hunting Lodge
- 2.12 Point L
- 3 Enemies
- 4 Bugs
- 5 Notes
- 6 Map
This is The Hunting Lodge of Mehrunes Dagon, the final level. Here, you will encounter—and hopefully defeat—Mehrunes Dagon. The path is straightforward, and will take you on a clockwise romp through the outskirts of the level until you reach the central island. Proceed carefully; there are many powerful opponents on the way, and you may fall (or be pushed) into the ever-present lava. To finish, you'll need to get the Sword of the Moon Reiver, the Savior's Hide and the Lyr, Seht, and Neht Sigils of Entry. There are a few Dark Seducers, and many Daedra Counts and Lords to face on this level, so be prepared.
Quick Walkthrough[edit]
- You start out at Point A. Read the scroll nearby for useful information. You don't need the regular magic items described within, but they are nice.
- Push over the tree between Points A and B to reach C, then kill the Dark Seducer there for the Broad Sword of the Moon Reiver. Making use of Jumping potions helps.
- Make your way to Point H. Say "Lehmekweh" to lower the bridge.
- Activate the crossbow device at Point I to cross the chasm.
- If you don't have the Saviors Hide from Level 5, talk to the Wraith at Point J.
- Make you way to Point K. One or several of the Daedra Lords have the Lyr Sigil of Entry needed to pass through.
- Inside the building, find the Neht and Seht Sigils of Entry. They can be found on Daedra Counts, or possibly in some of the chests.
- On the top level, touch the two purple spheres to activate the teleporter. This brings you to Mehrunes Dagon's room.
- Put on the Armor of the Saviors Hide and wield the Broadsword of the Moon Reiver. Talk to Dagon. Attack him as soon as you finish or you will die. That's it, enjoy the ending sequence.
Detailed Walkthrough[edit]
Point A - Entry: Small Island One[edit]

You arrive here from the gate in Havok Wellhead. On the ground is another scroll from your "friends" in Clan Dremora. It contains a wealth of useful information:
|
All told, to banish Mehrunes Dagon to Oblivion, rescue your friend, and escape alive, you'll need the Armor of the Savior's Hide, the Sword of the Moon Reiver, Dagon's protonymic and neonymic, and the help of your Nocturnal friend, Jaciel (don't worry if you have divested yourself of the Savior's Hide on a previous level, you can get it back again along the way).
Point B - Satellite[edit]

A Wraith here carries the Long Bow of Heaven's Hail. According to the scroll at Point A, this bow is deadly accurate with both arrows and spells.
Point C - Seducer Isle[edit]

This floating island is home to a Dark Seducer—Dagon's bodyguard—as well as some Daedra Lords. It is possible to jump the gap with the aid of a Jumping spell or potion, but you can also cross by pushing over a tree on the island between points A and B.
Kill the Daedra Lords; the Dark Seducer is not initially hostile, and will greet you on approach. As long as you don't offend or attack her, she will refrain from attacking you. However, Dagon has trusted her with the Sword of the Moon Reiver—and she is not willing to give it to you under any circumstance. Kill her and take the sword.
You will also find a pair of healing crystals on the far side of the island.
Point D - Satellite[edit]

A Wraith here carries the Boots of Peace. According to the scroll at Point A, these boots greatly enhance the Hand-to-Hand skill of the wearer.
Point E[edit]

You find a Wraith on each island. The first one carries another copy of the Boots of Peace, and the second one carries the Helmet of the Poor. According to the scroll, this Helm makes the user resistant to magical attacks. The tower at this point appears to serve no useful purpose, though two more healing crystals are found nearby.
Point F - Satellite Island[edit]

A Coffer of Restoration lies in the center of this otherwise unremarkable floating island.
Point G - Satellite Island[edit]

Another Wraith is found here, carrying the Helmet of Light Within. This helm is supposed to allow you to draw spell points from your opponents, but it didn't work that well. There are also two healing crystals alongside the tower here.
Point H - Pier One & Drawbridge[edit]


Cross the bridges to find a plunger switch here, before a raised drawbridge. When pressed, the switch commands you to "Identify Yourself". In your explorations of these islands, you will eventually come across one or more notes, apparently from Dagon to one of his lieutenants. Speak this lieutenant's name ("Lehmekweh") to lower the bridge and grant passage beyond.
A pair of healing crystals flank the bridge switch.
Point I - Pier Two & Drawbridge & Ballista[edit]

There is large crossbow device sitting here. When activated, it shoots a rope across the chasm to the central island, allowing you to pass safely. If you teleport back, jump onto the nearby teleporter platform to cross the gap again. Watch out for thorns later on near here, since they do damage (and can knock you into the lava). As before, proceed clockwise along the path to ascend the central mountain.
Point J[edit]

You find a strange Wraith here. Speak to it, and it becomes readily apparent that this one is not like the others. In fact, it isn't a Wraith at all, but another mysterious ally. If you no longer have the complete Armor of the Savior's Hide, the Wraith provides it for you.
If you still have the Savior's Hide from Level 5 you can talk to the wraith, but it will not disappear afterwards and instead attack you. Since it has apparently unlimited HP, it would be wise to run. If you drop the Savior's Hide before speaking to the Wraith, it will give you the new set, which is of better quality than the one you previously received, then vanish.
Point K - Hunting Lodge[edit]


You find a large force of Daedra Lords and Dark Seducers on the top plateau here, some of them carrying Lyr Sigils of Entry. The teleporter pad here brings you to Point L. Passing through the Lyr Sigils of Warding and through the doors will bring you very close to Mehrunes Dagon.
Once inside, fight your way through several Daedra Counts. They carry the Neht and Seht Sigils of Entry needed to pass through the wards guarding the lift to the third floor.
The lift brings you to another room, this one guarded by a quartet of Daedra Counts. In the center of this room sits a teleporter which can be activated by touching the two floating purple spheres on either side. Once activated, step into the beam to be transported to the room containing Mehrunes Dagon and your companion, Josian or Vatasha. Put on the six pieces of the Armor of the Savior's Hide and wield the Sword of the Moon Reiver, then talk to the Lord of Destruction.
At the conclusion of your chat with the Daedra Prince, while wearing the Savior's Hide and wielding the Broad Sword of the Moon Reiver, then having spoken his protonymic and neonymic, you call upon your Nocturnal ally Jaciel Morgen for help. She provides a momentary distraction, but your window of opportunity is vanishingly slim. As soon as you're done talking, attack Dagon with the Moon Reiver. One hit is all it takes to kill him, and once this is done, the game is at an end—sit back and enjoy the final cinematic sequence. If you don't attack right away you will die after a few seconds (you can do nothing to prevent this).
Point L[edit]

Destination of Teleporter at Point K.
Enemies[edit]
- 14x Daedra Count
- 17x Daedra Lord
- 12x Dark Seducer
- 33x Wraith
Bugs[edit]
- Terrain on this level may randomly damage you.
- Daedra Lords on the island at Point C can glitch inside the terrain, becoming unkillable.
- The orb that teleports you to Dagon's throne room may do nothing at all, making the game unwinnable. ?
- Standing above lava will damage the player. This includes standing on the edges of platforms and on the thin sliver of air between platforms and bridges. ?
- Various enemies may teleport under the platforms and will walk on the lava. ?
Notes[edit]
- Page 180 of the Battlespire Athenaeum provides text of an epilogue that does not appear in-game:
-
- From "The Chronicles of Janisiere":
-
- "...and the Emperor then commanded to bring forth the two champions who had served him so well, who knelt before him and received his blessing. He bid them rise and said to them, 'Let all present know how these two have served their Empire, for had not Jagar Tharn been robbed of the support of the archfiend Mehrunes Dagon and his fell minions, then Ria Silmane and her champion might never have revealed Tharn's imposture, and long might the rightful emperor have languished imprisoned in Dagon's dark prisons within the Void.' And he then made them great presents of land and chattels, and raised them up among his counselors, and conferred upon them offices of great importance in his Legions."
-
- From "Private Proceedings of the Imperial Commission":
-
- "Reinvestment of Battlespire is neither feasible nor desirable at this time. The open provocation and sweet temptation this installation presents to the Daedric Powers is obvious from recent events, and the installation is of no significant value to the maintenance of the Pax Imperia. In light of recent turbulence in the Border Provinces, and considering more pressing demands upon the treasury, we recommend that the gates to Battlespire be sealed indefinitely."
-
- From private correspondence of Julianos Cennan, Chamberlain to Uriel Septim
-
- "The Emperor questioned the heroes closely. One said that, when struck by the enchanted sword, Dagon appeared to have been sucked away and compressed into an ever-smaller volume, and then to have disappeared. The Emperor then inquired among his counselors how long we might be free of the Prince of Destruction. Their answers were various, hopeful, and unpersuasive. 'You have done all that might be done, sighed the Emperor, but Oblivion cannot long hold Dagon, and when he returns, he surely will count us among his most-cherished enemies.'"
- This location appears in ESO as the Isle of Joys.
Map[edit]
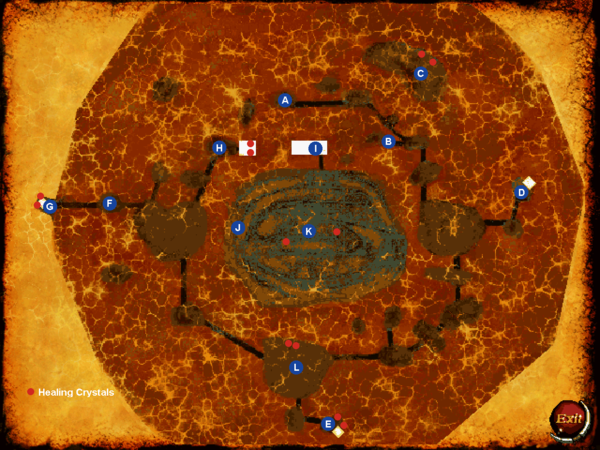
.png)
| Prev: The Havoc Wellhead | Up: Quests | Next: None |