Shivering:Xirethard
|
|||
|---|---|---|---|
| # of Zones | 3 | ||
| Occupants | |||
| Dark Seducers, Zealots, Shambles (2 Dark Seducer Royal Guards) |
|||
| Important Treasure | |||
| 1 boss-level Chest 1 boss-level Urn Ring of the Oceanborn 1 Hollowed Amber Limb 1 Madness Ore Deposit |
|||
| Console Location Code(s) | |||
| XPXirethardExterior, XPXirethard01, XPXirethard02, XPXirethard03 | |||
| Region | |||
| Dementia | |||
| Location | |||
| Northwest of New Sheoth Graveyard, east of The Hill of Suicides | |||
Xirethard is a large ruin west of New Sheoth containing Dark Seducers and monsters (quest-related). It contains three zones: Xirethard, Xirethard, Depths, and Xirethard, Subterrane.
Xirethard is an ancient ruin, once the home of a great nobleman. It is now used by the paranoid Dukes of Dementia as a secret escape route out of New Sheoth. It can be entered both through the entrance marked on the map or via a hidden access in the Private Gardens of the House of Dementia.
Related Quests[edit]
- Ritual of Dementia: Kill the Duchess of Dementia and take her place.
Notes[edit]
- Only zone Xirethard, Subterrane can be explored without starting the related quest.
- As the Duke or Duchess of Dementia, you may access Xirethard through the Private Gardens of the House of Dementia after the Main Quest; the first two zones will be devoid of any Seducers or Syl.
- As the Duke or Duchess of Mania, after the Main Quest, you may access Xirethard from the Isles through Xirethard, Subterrane. You may proceed through all three zones. Xirethard Subterrane will be occupied by Shambles. Xirethard, Depths and Xirethard will be populated by Dark Seducers.
- WARNING: You will be trapped upon entering the Private Gardens of the House of Dementia if you chose to become Duke or Duchess of Mania. The only way out is to successfully utilize Sheogorath's Protection by dying within the garden, or to use console commands (e.g. open the console, click on a door leading to the House of Dementia, then type
unlock). Console players will be unable to escape this trap without reloading from an earlier saved game or utilizing Sheogorath's Protection.
- WARNING: You will be trapped upon entering the Private Gardens of the House of Dementia if you chose to become Duke or Duchess of Mania. The only way out is to successfully utilize Sheogorath's Protection by dying within the garden, or to use console commands (e.g. open the console, click on a door leading to the House of Dementia, then type
- Two test zones related to this ruin didn't make it to the game.
XPXirethard04andXPXirethard05are console codes for two Ayleid Ruin-like areas both called "Xirethard" that link to each other but nothing else. - This ruin contains 2 Root Stalk plants and 4 Withering Moon plants.
Exterior[edit]
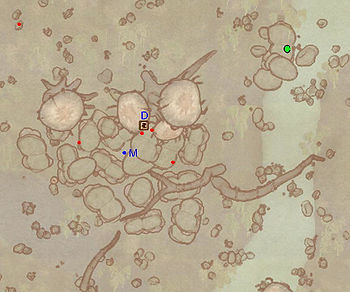
- The exterior is located at coordinates: SEWorld 7, 3
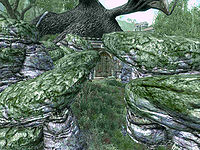
- This location's map marker (M on map) is named Xirethard. The entrance door is NE of the marker, 40 feet away. Note, however, that the door will take you to zone Xirethard, Subterrane, from which it is impossible to access the rest of the dungeon.
- 1 Dark Seducer Mage (non-respawning) is near the entrance
- 2 Dark Seducers (non-respawning) are near the entrance
- 1 Dark Seducer Archer (non-respawning) is near the entrance
- 1 Wilderness Creature (Shoreline variety; Dementia) is near the entrance
- 1 Crystal Chest (requires Heart of Order to open; non-respawning) is at location C on map
- The following plants can be found near the entrance: 10 Fungus Stalk plants, 7 Mushroom Tree Sapling plants, and 4 Water Root Pod plants
Zone 1: Xirethard[edit]
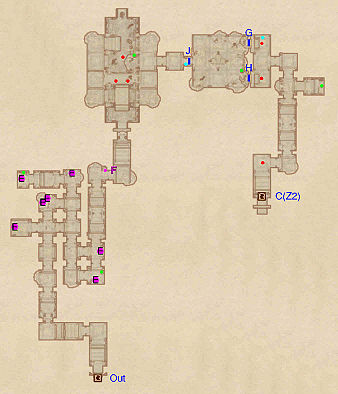
This zone is fairly linear, with most loot found on route. The first area is a hive of hunger statues (E), so try to avoid the shots as you proceed north. At the first intersection head right, then north again and then left, all the while dodging the hunger shots to access a chest near a statue. Backtrack south, loot the urn nearby and head north along the corridor. Activate the button at F and enter the next room, where two Seducers are found on a bridge above you and a third on your level. Try to use a sneak shot from the corridor to take out one of them to avoid being ganged up on. As soon as you enter the next room the hidden wall at G will open and two Seducers will attack you. Defeat them and proceed to the next zone through door C.
If you enter Xirethard before the related quest, the gate in the room with the self-opening hidden walls is opened with the push block (cyan dot) next to the northern wall.
Occupants:
- 4 Dark Seducers (non-respawning)
- 2 Dark Seducer Archers (non-respawning)
Treasure:
- 1 Chest (Healing)
- 1 Urn (locked)
- 3 Urns (Healing)
Traps:
- 1 Button at location F on map
- 7 Hunger Statue traps at E
Doors and Gates:
- There are two doors in/out of this zone
- 1 door (at Out) leads to the House of Dementia Private Gardens
- 1 door (at C) leads to the zone Xirethard, Depths
- 1 Secret Wall at H
- 1 Secret Wall (Wall opens when player comes too close, hides a Dark Seducer) at G
Zone 2: Xirethard, Depths[edit]
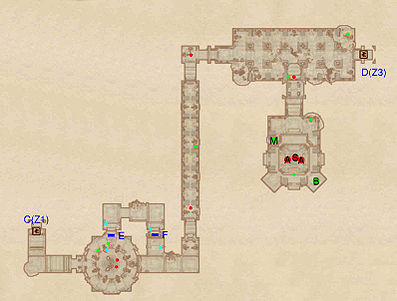
The first room you enter will be full of statues and banners as well as a load of overturned stone furniture and silverware. Here, two Seducers are guarding two minor-loot chests. Open the secret wall at E by activating the button nearby (cyan dot on map) and repeat the procedure with the wall at F. Kill the patrolling Seducers in the very long corridor and enter the next room. Here, try to take out the Seducer guarding the door to Syl's room with a sneak shot to avoid alerting her to your presence. Open the door and take another sneak shot at her (S), and prepare for a tough battle with her and her Royal Guards (A). Once you're done, pick up her weapon and loot the madness ore deposit at M and the boss chest at B. Now you can either backtrack to the Palace or enter the next zone through door D.
Occupants:
- Syl at location S on map
- 2 Dark Seducer Royal Guards (non-respawning) at locations A on map
- 3 Dark Seducers (non-respawning)
- 2 Dark Seducer Archers (non-respawning)
Treasure:
- 1 boss-level Chest (Zealot variety) at location B on map
- 1 Madness Ore Deposit (1-4 Madness Ore; non-respawning) at M
- 2 Chests (1 locked)
- 1 Urn
- 4 Urns (Healing)
Doors and Gates:
- There are two doors in/out of this zone
- 1 door (at C) leads to the zone Xirethard
- 1 door (at D) leads to the zone Xirethard, Subterrane
- 1 Secret Wall at E
- 1 Secret Wall at F
Zone 3: Xirethard, Subterrane[edit]
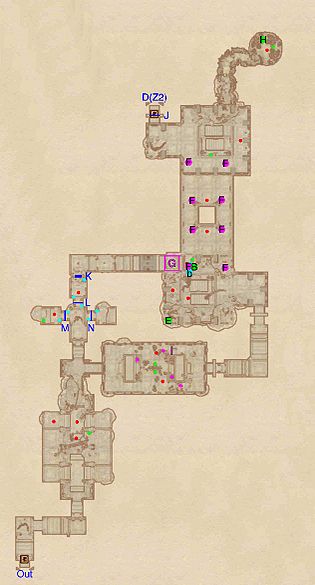
After you enter, ignore the stairs going down and head north to a root cave area where you will find an enemy guarding a hollowed stump and an amber vein (H). Head down the stairs and don't miss a chest on a ledge to your left. The room you enter contains various criss-crossing hunger statues as well as two enemies, but it shouldn't pose too much of a threat. Follow the stairs up to a candle-lit room and head over to a pile of rubble in the southwestern corner - the easter egg Dark Chest of Wonders (E) is at the top.
Avoid the cave in traps (I) in the next room and head north at the intersection until you arrive at a cell block. The cell on the right holds nothing of value, but open the gate (M) to the one on the left to access a minor loot chest. Open the gate at L and the hidden wall at K by activating the buttons near them (cyan dots on map). Once you reach the end of the corridor, defeat the Zealot nearby and loot the standard and boss level (B) urns before heading back to the original intersection. If you activate the push block nearby, the floor in front of you will open up (G), with a lengthy fall down to the hunger statue room. Jump over it and head back to the intersection. Once you're there, head south and battle three enemies to reach the door leading outside (Out). Be warned however, that the four Seducers on guard outside will be hostile, so expect another fight.
Occupants:
Treasure:
- 1 boss-level Urn (Zealot variety) at location B on map
- 1 Dark Chest of Wonders (contains Ring of the Oceanborn; non-respawning; locked) at E
- 1 Hollowed Amber Limb (1-4 Amber; non-respawning) at H
- 2 Chests
- 1 Hollowed Stump
- 2 Urns (Healing)
- 1 Urn (Healing)
- 1 Urn 02 (locked)
- The following plants will always be found: 2 Root Stalk plants and 4 Withering Moon plants
Traps:
- 4 Cave In traps at locations I on map
- 8 Hunger Statue traps at F
- 1 Trapped Floor trap at G
Doors and Gates:
- There are two doors in/out of this zone:
- 1 door (at Out) leads outside
- 1 door (at D) leads to the zone Xirethard, Depths
- 3 Metal Gates (Initially closed bar gate) at L, M, and N
- 1 Wooden Door at J (locked, says 'key required' but there is no key)
- 1 Secret Wall at K
Other:
- 1 bedroll at location b on map
