Oblivion:Rickety Mine
|
|||
|---|---|---|---|
| # of Zones | 2 | ||
| Occupants | |||
| Bandits (1 boss-level Bandit) |
|||
| Important Treasure | |||
| 1 boss-level Chest 01 | |||
| Console Location Code(s) | |||
| RicketyMineExterior, RicketyMine, RicketyMine02 | |||
| Region | |||
| Nibenay Basin | |||
| Location | |||
| East of Cheydinhal | |||
Rickety Mine is a medium-sized mine east of Cheydinhal containing bandits. It contains two zones: Rickety Mine and Rickety Mine Bottom Section.
Notes[edit]
- This mine contains 7 Cairn Bolete plants and 17 Wisp Stalk plants.
- The map marker can be added by talking with Borba gra-Uzgash in Cheydinhal.
Exterior[edit]
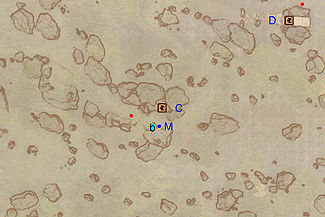
- The exterior is located at coordinates: Tamriel 33, 22
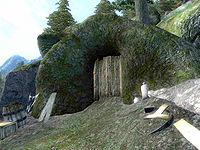
- This location's map marker (M on map) is named Rickety Mine (editor name RicketyMineMapMarker). The entrance door is N of the marker, 20 feet away.
- 1 Wilderness Creature (Forested Mountains variety) is near the entrance
- 2 Wilderness Creatures (Mountains variety) are near the entrance
- The following weapons can be found near the entrance: 3 Iron Arrows
- The following plants can be found near the entrance: 3 Bergamot plants, 25 Clouded Funnel Cap plants, 1 Ginseng plant, 3 Monkshood plants, 12 Motherwort plants, and 13 Tinder Polypore plants
- 1 bedroll is at location b on map
Zone 1: Rickety Mine[edit]
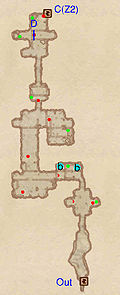
This zone is relatively straightforward. The first room you'll see when entering contains one enemy and a minor loot chest, with the possibility of a second enemy. When advancing through the wooden door, you will arrive in a C-shaped area. This area holds at least three enemies. There are also a minor loot chest, two bedrolls at location b, and a torn sack of grain.
Delving deeper into this mine leads you past two minor loot chests and at least one enemy. In the last part of this zone, a minor loot chest and a barrel are concealed by some planks. Push these loose planks to get to them. Enter door C to arrive at Rickety Mine Bottom Section.
Occupants:
- 7-9 Bandit Enemies (each 50% probability melee , 25% archer Bandit, 12% Dog, 12% Nuisance Animal)
Treasure:
- 2 Chests 01 (1 locked)
- 3 Chests 02 (1 locked)
- 1 Chest 04
- The following plants will always be found: 1 Cairn Bolete plant
Doors and Gates:
- There are two doors in/out of this zone
- 1 door (at Out) leads outside
- 1 door (at C) leads to the zone Rickety Mine Bottom Section
- 1 Break-away wall ('Push Loose Planks') at D
Other:
- 2 bedrolls at locations b on map
Zone 2: Rickety Mine Bottom Section[edit]
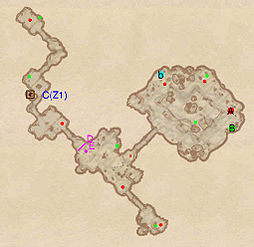
This zone is bit more complicated than the first zone, but not by much. When entering this zone, you can head either northeast or south. Going northeast leads you to a lone bandit guarding a minor loot chest.
The southern path leads you to a room containing one enemy, a food sack, and several bottles of ale, located on a table. Watch out for the Swinging Log trap at E when advancing to the next area. This room has at least one enemy and one minor loot chest. From here, there are two possible paths you can take. The one to the southeast leads you to a dead end with a locked chest guarded by an enemy. The path to the northeast leads to a big room. This room contains three enemies, including a bandit ringleader at A. The boss-level chest (B) is also located here. After the battle you can sleep in a bedroll, which is very conveniently located at b.
Occupants:
- 1 boss-level Bandit at location A on map
- 5-6 Bandit Enemies (each 50% probability melee , 25% archer Bandit, 12% Dog, 12% Nuisance Animal)
- 1 Bandit Bowman
Treasure:
- 1 boss-level Chest 01 (Bandit variety) at location B on map
- 1 Chest 01 (locked)
- 1 Chest 02 (locked)
- 2 Chests 03
- 2 Chests 04
- The following plants will always be found: 6 Cairn Bolete plants and 17 Wisp Stalk plants
Traps:
- 1 Swinging Log trap at location E on map
- 1 Tripwire trigger at D
Doors and Gates:
- There is one door (at C) in/out of this zone, leading to the zone Rickety Mine
Other:
- 1 bedroll at location b on map


