Oblivion:Fort Homestead
| This place page is currently being rechecked as part of the Oblivion Remastered Project. The page is being checked in several stages to verify any changes due to the release of Oblivion Remastered. All users are welcome to make changes to the page. If you make a change that is relevant to the project, please update this template accordingly, and make sure you have observed the project guidelines. Details Walkthrough: not written Interior Remastered Images: not added |
|
|||
|---|---|---|---|
| # of Zones | 3 | ||
| Occupants | |||
| Marauders (1 boss-level Marauder) |
|||
| Important Treasure | |||
| 1 boss-level Chest | |||
| Console Location Code(s) | |||
| FortHomesteadExterior, FortHomestead01, FortHomestead02, FortHomestead03 | |||
| Region | |||
| Heartlands | |||
| Location | |||
| South of the Imperial City, near the intersection of the Red Ring Road and the Green Road | |||
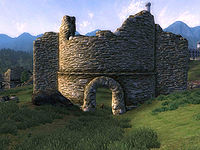
Fort Homestead is a medium-sized fort south of the Imperial City containing marauders. It contains three zones: Fort Homestead, Fort Homestead Passages, and Fort Homestead Heroes' Hall.
Notes[edit]
- The marker for the exit of the fort is placed in a way that may cause NPCs following you outside to spawn on the level of the fort above the door.
- Fort Homestead appears in ESO as Homestead Ruins.
Exterior[edit]
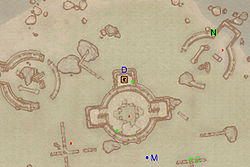
- The exterior is located at coordinates: Tamriel 5, 7
- This location's map marker (M on map) is named Fort Homestead (editor name FortHomesteadMapMarker). The entrance door is NNW of the marker, 130 feet away.
- 0-3 Bandit Enemies (each 50% probability melee , 25% archer Bandit, 25% Dog) are near the entrance
- 1 Nirnroot is at location N on map
- Another Nirnroot is inside the circular ruins just west of the entrance, just outside the map
- 1 Chest 01 is near the entrance
- 1 Wilderness Chest 01 (non-respawning) is near the entrance
- The other following items can be found near the entrance: 1 Absorb Health scroll, 2 Gold Nuggets, 4 Silver Nuggets, and 1 Weak Poison of Clumsiness
- Some of the above items are clustered at C: 2 Gold Nuggets and 4 Silver Nuggets
- The Absorb Health scroll is next to a skeleton lying on the shore beside the wall of the northeastern section of the fort, along with two bottles of mead
- The Weak Poison of Clumsiness is next to another skeleton lying between two boulders just northwest of the main section of the fort, along with eight bottles of beer
Zone 1: Fort Homestead[edit]
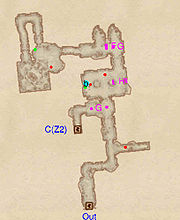
This zone is fairly straightforward. There is a side passage in the first corridor in which a nuisance animal is hiding. Afterward, you arrive at a door leading to the first room, outside which are two Pressure Plate triggers at G that activate nothing. If you go to the left before passing through the door, you will arrive at the door to Fort Homestead Passages at C.
If you continue on, however, the first room has two enemies, a minor loot chest, and a pair of nasty Darts traps on the east side of the room. Continuing down the stairs, you should beware the three Swinging Mace traps just around the corner to the left, all activated by the Pressure Plate at G. The final room is a dead end; you can find an enemy and a minor loot chest here.
Occupants:
- 1 Campsite Marauder (each 50% probability melee Marauder, 16% archer Marauder, 16% Marauder Battlemage, 16% dog)
- 1 archer Marauder
- 1 melee Marauder
- 1 Rat
Treasure:
Traps:
- 2 Darts traps at location H on map
- 3 Pressure Plate triggers at G
- 3 Swinging Mace traps at F
Doors and Gates:
- There are two doors in/out of this zone
- 1 door (at Out) leads outside
- 1 door (at C) leads to the zone Fort Homestead Passages
Other:
- 1 bedroll at location b on map
Zone 2: Fort Homestead Passages[edit]
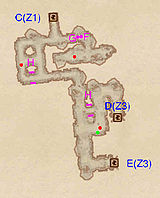
You will enter this zone at an intersection. If you go east, you will only find a Swinging Mace trap and yet another rat. If you go west, you will arrive in a pillared room containing a marauder and a pair of Darts traps at the back.
The next room is equipped with another pair of Darts traps, with a minor loot chest to the southeast. You can choose which way you want to exit this area: to the east or straight south. Both paths lead to the zone Fort Homestead Heroes' Hall; the eastern exit leads to an otherwise inaccessible unguarded treasure room (door D), while the southern exit leads to the zone's main entrance (door E).
Occupants:
- 1 Campsite Marauder (each 50% probability melee Marauder, 16% archer Marauder, 16% Marauder Battlemage, 16% dog)
- 1 melee Marauder
- 1 Rat
Treasure:
- 1 Chest 02
Traps:
- 4 Darts traps at locations H on map
- 1 Pressure Plate trigger at F
- 1 Swinging Mace trap at G
Doors and Gates:
- There are three doors in/out of this zone
- 1 door (at C) leads to the zone Fort Homestead
- 2 doors (at D and E) lead to the zone Fort Homestead Heroes' Hall
Zone 3: Fort Homestead Heroes' Hall[edit]
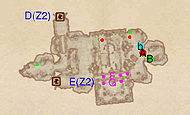
There are two ways to enter this zone: through the main entrance (door E) or on a bridge which overlooks the main chamber (door D). The second path offers a good vantage point to attack one of the marauders, as well as access to an otherwise inaccessible unguarded room containing a minor loot chest, a skeleton, and two pieces of static loot (a Potion of Feather and a Silver War Axe).
This zone is essentially a large room with a pit in the middle and a bridge across it. The bridge is rigged with three very painful Swinging Mace traps. The best way to cope with them is to alert the enemies on the other side and let them trigger the traps; otherwise, you should run quickly across the bridge to avoid the traps. There are three marauders in this room, including the boss-level marauder (A); you should prepare for a difficult fight, especially as you may easily alert all three enemies at the same time. Across the bridge to the east is the boss chest (B), a minor loot chest, and a bedroll (b), which provides convenient healing after the many enemies and traps encountered throughout the fort.
Occupants:
- 1 boss-level Marauder at location A on map
- 1 Campsite Marauder (each 50% probability melee Marauder, 16% archer Marauder, 16% Marauder Battlemage, 16% dog)
- 1 archer Marauder
Treasure:
- 1 boss-level Chest (Marauder variety) at location B on map
- 1 Chest 02 (locked)
- 1 Chest 04
- The other following items will always be found: 1 Potion of Feather and 1 Silver War Axe
Traps:
- 2 Pressure Plate triggers at location F on map
- 3 Swinging Mace traps at G
Doors and Gates:
- There are two doors (at D and E) in/out of this zone, both leading to the zone Fort Homestead Passages
Other:
- 1 bedroll at location b on map
