Oblivion:Arkved's Tower
| This place page is currently being rechecked as part of the Oblivion Remastered Project. The page is being checked in several stages to verify any changes due to the release of Oblivion Remastered. All users are welcome to make changes to the page. If you make a change that is relevant to the project, please update this template accordingly, and make sure you have observed the project guidelines. Details Walkthrough: not written Interior Remastered Images: not added |
|
|||
|---|---|---|---|
| # of Zones | 8 | ||
| Occupants | |||
| Arkved Daedra |
|||
| Important Treasure | |||
| Orb of Vaermina 1 Illusion Skill Book |
|||
| Console Location Code(s) | |||
| ArkvedsTowerExterior, ArkvedsTower01, ArkvedsTower02, ArkvedsTower03, ArkvedsTowerWorld, ArkvedsTower04, ArkvedsTower05, ArkvedsTower06, ArkvedsTower07 | |||
| Region | |||
| Nibenay Basin | |||
| Location | |||
| Southwest of Cheydinhal and past Vaermina's Shrine | |||
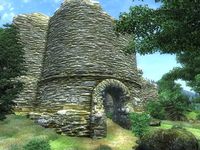
Arkved's Tower is a large fort southwest of Cheydinhal containing daedra (quest-related). It contains eight zones: Arkved's Tower, Arkved's Void, Arkved's Lost Halls, Arkved's Oasis, Arkved's Hall of Changes, Arkved's Retreat, Arkved's Rending Halls, and Arkved's Death Quarters.
Related Quests[edit]
- Vaermina: Retrieve the Orb of Vaermina from the wizard, Arkved.
Notes[edit]
- This fort cannot be entered until you have initiated the related quest.
- You cannot wait in the first zone because it is considered trespassing.
- At high levels, be cautious of the Clannfears that you meet in this ruin. At levels 17 and higher, the Clannfears are a leveled variety of Clannfear that are only found in this one location.
- Arkved's Tower appears in ESO as Mist Morrow Tower.
- The trapdoor to Arkved's Death Quarters may be found unlocked from the outside. That allows you to enter that area directly and retrieve the Orb immediately with no combat.
Exterior[edit]
- The exterior is located at coordinates: Tamriel 24, 12
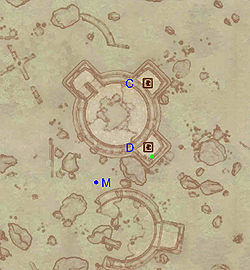
- This location's map marker (M on map) is named Arkved's Tower (editor name ArkvedsTowerMapMarker01). The entrance door (D) is NE of the marker, 70 feet away.
- The trapdoor at C (leading to Arkved's Death Quarters) does not appear until the player has entered Arkved's Rending Halls
- 1 Wilderness Chest 04 (non-respawning) is near the entrance
- The following potions can be found near the entrance: 1 Potion of Might and 1 Strong Potion of Sorcery
- The following plants can be found near the entrance: 12 Bergamot plants, 1 Flax plant, 20 Lavender plants, 22 Monkshood plants, 2 Morning Glory plants, and 3 Viper's Bugloss plants
Zone 1: Arkved's Tower[edit]
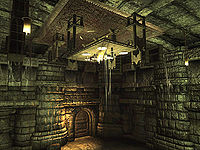
Arkved's Tower is a surreal and unique dungeon manifesting the eternal nightmares of a wizard who stole the Orb of Vaermina and got more than he bargained for. The first zone starts out fairly normal and the first room appears as a familiar dining room with tapestries and a dinner table set with silverware and a bottle of wine. Note that items taken in this room will be tallied as stolen even though no 'red hand' indication is shown. Also in the room are several wine bottles in a rack, a locked minor loot chest and even a small book collection. The next room, however, showcases Arkved's nightmares, as it is the exact same dining room, just turned upside down, with the table and food glued to the ceiling. It is possible to 'loosen' the kitchen utensils by jumping up and activate one of the items. In the third room, the environment changes to a cave-structure and is bathed in red light with two leveled Daedra wandering about. The last tunnel leads to the next zone, Arkved's Void.
Occupants:
- 1 Daedra
- 1 Daedra (always best possible level)
Treasure:
- 2 Chests 01 (1 locked)
- 1 Chest 04
- The following books will always be found: 1 The Argonian Account, Book 2 and 1 The Argonian Account, Book 4
Doors and Gates:
- There are two doors in/out of this zone
- 1 door (at Out) leads outside
- 1 door (at C) leads to the zone Arkved's Void
Zone 2: Arkved's Void[edit]
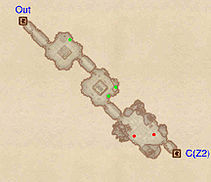
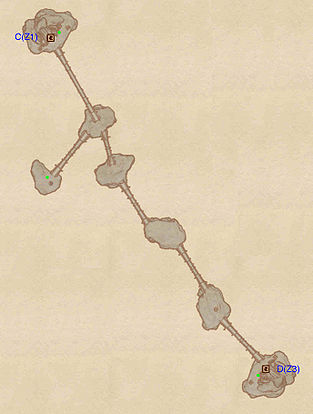
This zone resembles the bridges connecting the towers in the Planes of Oblivion, and falling into the pitch-black void will only net you eternal darkness and certain death. Just balance on the bridges and follow the map marker. Make sure to loot the three chests along the way; one is near the entrance at C, while another is found by heading west at the first intersection and the third sits next to door D, which leads to Arkved's Lost Halls.
Treasure:
Doors and Gates:
- There are two doors in/out of this zone
- 1 door (at C) leads to the zone Arkved's Tower
- 1 door (at D) leads to the zone Arkved's Lost Halls
Zone 3: Arkved's Lost Halls[edit]
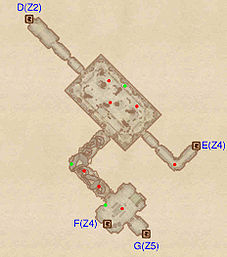
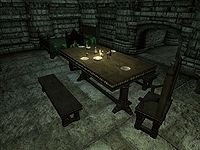
More visions are on display in the Lost Halls, and several exits as well. Upon arriving from door D, make your way to the large central chamber and fight the three unique and potentially strong Clannfears (see notes), then take a look around; apart from the trees growing from the floor and out the ceiling and a locked chest, three doors leads to different parts of Arkved's nightmare and a strategic advantage; If you feel like circumventing two of the Daedra to the south (red dots on map) you can take the path leading east and locate door E which will land you on the upper level of Arkved's Oasis. This strategy will eventually lead you back to this zone from the trapdoor at F, in a dining room once again twisted by Arkved's imagination, with oversized furniture and a bottle of wine. From this surreal room, there is quick access to door G, the entrance to Arkved's Hall of Changes.
Occupants:
- 3 Clannfears (location-specific leveled variety)
- 4 Daedra
Treasure:
Doors and Gates:
- There are four doors in/out of this zone
- 1 door (at D) leads to the zone Arkved's Void
- 2 doors (at E and F) lead to the zone Arkved's Oasis
- 1 door (at G) leads to the zone Arkved's Hall of Changes
Zone 4: Arkved's Oasis[edit]
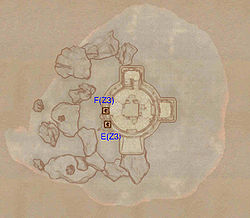
This exterior zone is situated on a small Oblivion island. There is nothing here in terms of loot or anything valuable and the zone merely serves as a useful shortcut to avoid a few enemies in the blood-soaked hallway of Arkved's Lost Halls, but only if you arrive from the upper-leveled door E and are willing to take damage from the drop down to door F. Arriving to this zone from door F is useless as the shore below contains absolutely nothing of interest.
Note: If you enter from door E, you can explore the center of the tower if your athletics is high enough. However SAVE before you do so as there is no way out once you fall into the center of the tower and your athletics aren't high enough. Jump left onto the roof ledge and climb up. In the center are stairs leading down, the tower's support beams, and a small alcove, all hovering above the ground. There is also an "Old wooden door" down here, but interacting with it has no effect. In order to get out climb to the lower stairs again and go to the first floor, one of the rooms has a broken wall you can jump to the outside of the tower. Once outside, you have to border the rocks with care in order to avoid lava damage, a restore health potion can be of help here.
Doors and Gates:
- There are two doors (at F and E) in/out of this zone, both leading to the zone Arkved's Lost Halls.
Zone 5: Arkved's Hall of Changes[edit]
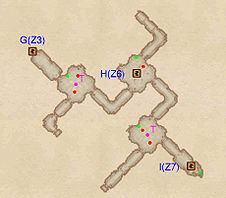
The Hall of Changes is by far the most dangerous and confusing zone, due to the two mean-spirited Dark Welkynd Stones, designed to dispose of you while you attempt to find a door that doesn't lead anywhere. All the dead ends contain nothing of interest so it is recommended to make haste through the rooms with the traps. The first room contains a Dark Welkynd Stone (T) shooting Frost spells, two Daedra enemies and two doors, the one straight ahead being the correct one. The central room is a torture chamber filled with blood and dead zombies and contains a trap door leading to the dead-end zone Arkved's Retreat at H. The door next to the minor loot chest leads nowhere so pick the other one. The last room has another Dark Welkynd Stone (T) shooting Shock spells, two enemies and two doors. The one leading east is the correct one and will take you to door I, the entrance to Arkved's Rending Halls.
Occupants:
- 5 Daedra
Treasure:
Traps:
- 2 Dark Welkynd Stone traps at locations T on map
Doors and Gates:
- There are three doors in/out of this zone
- 1 door (at G) leads to the zone Arkved's Lost Halls
- 1 door (at H) leads to the zone Arkved's Retreat
- 1 door (at I) leads to the zone Arkved's Rending Halls
Zone 6: Arkved's Retreat[edit]
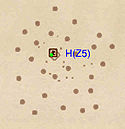
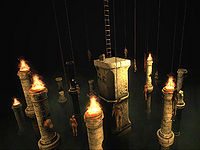
Arkved's Retreat showcases more of the cursed wizard's nightmares, and is merely a single platform with nothing but a restoration chest and the ladder (H) leading back up to Arkved's Hall of Changes. The surrounding area is pitch black in all directions with only the macabre sight of several rotten corpses dangling from ropes, some of them on fire, to light up the place. While it is possible to jump onto a few of the unlit pillars, it is impossible to get back up and a fall will lead to certain death in the void.
Treasure:
- 1 Chest 04
Doors and Gates:
- There is one door (at H) in/out of this zone, leading to the zone Arkved's Hall of Changes
Zone 7: Arkved's Rending Halls[edit]
This zone is a blood-soaked and completely straightforward corridor filled to the brim with Daedra enemies and unanimated zombie corpses, some of them on the floor, others clamped to the walls. To avoid having all six enemies gang up on you, proceed patiently forward and try to lure the enemies to you one at a time. A few minor loots chests can be found along the way and the trapdoor at J leads to the sleeping wizard in the final zone, Arkved's Death Quarters, evident by the high pitch, dream-like sound in the background. (listen).
Occupants:
- 6 Daedra
Treasure:
Doors and Gates:
- There are two doors in/out of this zone
- 1 door (at I) leads to the zone Arkved's Hall of Changes
- 1 door (at J) leads out of dungeon to Arkved's Death Quarters
Zone 8: Arkved's Death Quarters[edit]
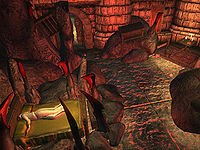
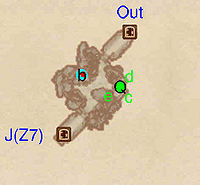
The final zone is one room only, sealed behind an ancient portcullis gate; it is the final and eternal resting place for Arkved doomed by Vaermina to live out his nightmares forever. You will find him asleep in his Daedra-infested bed (b) surrounded by furniture overturned by rocks. The cupboard and drawers contain upper-class clothing, and the chest at the foot of the bed only holds clutter. The small table in the corner holds the Orb of Vaermina at Q, along with a note written in a trembling hand, two crumpled pieces of paper and the Illusion skill book Palla, volume 1. The wooden door leads to door Out, a much-needed escape from Arkved's nightmares.
Occupants:
- Arkved (non-respawning)
Treasure:
- Orb of Vaermina at location Q on map
- 1 Illusion Skill Book: Palla, volume 1
- 1 Crumpled Piece of Paper at d
- 1 Crumpled Piece of Paper at e
- 1 Handwritten Note at c
- Some of the above items are clustered at location c: 1 Crumpled Piece of Paper, 1 Crumpled Piece of Paper, 1 Handwritten Note.
Doors and Gates:
- There are two doors in/out of this zone
- 1 door (at Out) leads outside
- 1 door (at J) leads to the zone Arkved's Rending Halls
Other:
- 1 bed at location b on map
