Skyrim:Revealing the Unseen
|
Quick Walkthrough[edit]
- Speak with Mirabelle at the College of Winterhold.
- Find the ruins of Mzulft.
- Find the Synod researchers.
- Find the Oculory.
- Activate the Oculory.
- Learn the location of the Staff of Magnus.
- Report to Savos Aren at the College of Winterhold.
Detailed Walkthrough[edit]
The Synod and the Staff[edit]
From the events of Good Intentions, you have learned from both the Augur of Dunlain and Savos Aren that the Staff of Magnus is a necessary part of averting the prophesied disaster. After speaking with Savos, ask Mirabelle what she knows about the Staff of Magnus and its whereabouts. She is a bit skeptical at first, but does mention that the members of a mystical group, the Synod, recently questioned her about it. While she did tell the mages that the College did not have the Staff she remembers the group talking about the Dwemer ruin Mzulft. She speculates that the Synod group may be traveling there to locate the Staff.
Your Journey to Mzulft Begins[edit]
Mirabelle will mark Mzulft's location on your map: southeast of Windhelm. You may reach it by traveling on the road south from Windhelm Stables toward Riften. As you enter Mzulft's interior, you will find a Synod researcher, Gavros Plinius, uttering his final words, "Crystal... gone.... Find...Paratus...in Oculory..." Search Gavros to find a research log which indicates he was sent here by the Synod Council with a "focusing crystal" needed to pursue some mysterious effort, and that the crystal needs to get to the Oculory right away. Take the Mzulft key from his corpse to unlock the adjacent door. This man Paratus seems to be an important part of this puzzle, so travel through the extensive ruin to a curious device called the Oculory. Mzulft contains a wealth of Dwemer items and multitudes of the hostile creatures and machines that typically populate Dwemer ruins. A detailed guide to the Oculory is in the table below.
| Getting to the Oculory |
|---|
|
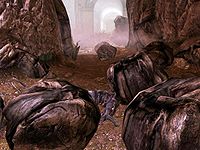
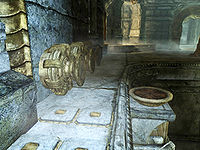
Proceed through the door into a room containing a number of Dwemer metallic items. Ascend a ramp at the far end of the room. Around the corner, a pressure plate on the floor activates a ceiling spike trap. Beyond this, the body of another Synod researcher lies on the floor. At the entrance to the next large room, you will encounter two Dwarven spider workers. Two more spiders will attack in the room at the top of the next ramp. Two doors open from this room. The door to the north is guarded by a floor spike trap and contains some minor loot and a moonstone ore vein. The other door takes you up a ramp and into a room where a Dwarven spider will spring from its port at the far end. From here, continue into an area illuminated by natural light. If you turn left next to the exit, jump over the rocks next to the tree, and go to the corner, you'll find a Dwarven shield. A leveled chaurus feasts on another researcher near the far end of the first cavern. The tunnel leading out has a tripwire that activates a falling boulders trap, and two more chaurus (one of them leveled) are scuttling about. At the top of the next ramp around the corner a Dwarven sphere will drop from a port just outside a locked gate. After battling the sphere, move up another ramp and through another door. Beyond this awaits another spider, and beyond that another sphere at the end of the hall. As you move further into the ruin you come to a room with stairs leading down to a pit, a corridor leading north, and a spider.
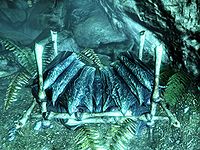
In the next room, a sphere will meet you on the far side of a narrow ledge rigged with a steam piston traps and pressure plates which will only push you off into the pit below if activated. The door that leads to Mzulft Boilery is up a ramp to the east. A strong leveled Falmer roams the area at the top of the ramp beyond. You will also find another dead researcher before heading up the next ramp. At the top of the ramp, fight another leveled Falmer, and then two more in the room through an open doorway to the north. A gate to the north opens into an empty room. The way forward is through the smaller connected room to the east. Heading east will bring you to an area consisting of natural caverns. When you enter a fairly lengthy tunnel, prepare to meet a leveled chaurus. Exit the tunnel through a narrow opening to your left. You will then see to your right the opening to a cavern illuminated with a slightly bluish light. If you wait and watch, you may see the occupants of this cavern walking around: a leveled Falmer attended by a chaurus. A claw trap which swings out from the left wall and is activated by a tripwire is behind a Falmer hut. A second chaurus will probably activate the tripwire on its way to meet you. Continue through the cavern as the path twists and turns.Ahead, there is another dead Synod researcher, and if they hear you, you might encounter two more Falmer here, one of which will be the highest-level variant you can encounter at your level, and the second will likely be nearly as strong. Your next left leads into a cavern containing another Falmer hut, and another dead Synod researcher near the doorway. The tunnel out is along the north wall, but be prepared to meet another chaurus in the next room. Further on, you will face a high-leveled Falmer in a room with a master-locked door leading to a chest and a copy of the Alteration skill book The Lunar Lorkhan. On the table is a key that will open an expert-locked door just ahead. Continue west until you come to a large rectangular hall divided by a shallow pool. On the far side of the pool await two leveled Falmer. Another researcher lies just before the door in the northeast corner leading to Mzluft Aedrome. |
After a lengthy and adventurous journey, go through the door to the third interior area, Mzulft Aedrome. Ascend the ramp and near the top you will find a leveled Falmer and a chaurus. Continue toward a large, multi-leveled room that can be accessed through either of two open doorways. Inside prowl four leveled Falmer, including one of the strongest variant you will find at your level, and one that will be carrying the focusing crystal mentioned in Gavros's research log. You need to obtain the crystal to complete the quest.
Mzulft Observatory[edit]
Your objective marker will point westward from here, but you should first obtain a key that you will need. To do this, leave the room through the doorway to the east and descend the ramp, then open the door at the bottom. Cross the next room and open another door leading eastward. Proceed until you reach a room containing two dead Falmer. Beyond the next door to the east waits a Dwarven automaton. It can be a Dwarven Centurion of the strongest type you can confront at your level. A Centurion on the other side will not be able to fit through the door to attack you up close, whether the machine breaks open the door or you open the door first. Keeping a distance makes it easy to dodge its steam attacks and pick at the machine with your own ranged attacks. After destroying it, obtain the Mzulft Observatory key from the chest on the east side of the room. Retrace your steps westward, back into the large room where you battled the four Falmer.
Climb the stairs to the west and open the door there with the Observatory key. Beyond this, there is another locked door which you cannot open. When you try to do so, however, you will hear a voice from the other side, and the door will be opened by Paratus Decimius, a Synod member who is expecting Gavros, the dying man you met upon entering the ruin. Paratus will be suspicious of you; but whatever the course of your conversation, when he finds out that you have the focusing crystal, he will agree to work together with you and ask you to follow him. You will note in your quest journal that you have reached the Oculory and that your plan now is to follow Paratus to investigate further.
At the Oculory[edit]
As he leads you forward, Paratus will explain that the Synod happened on this machine created by the Dwarves for unknown purposes, and that the Synod now intends to try to use it toward some different end. Ascend a curved ramp along a giant sphere, but be careful not to fall off, as doing so can cause you to become stuck. At the top, Paratus will marvel at the magnificence of the device there and ask you to place the crystal into the central apparatus.
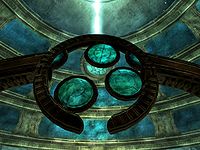
Stand as shown (photo), and place the crystal by activating the "Dwarven Armillary".
When you have done so, the ring will rotate so that the focusing crystal is positioned at the top. Your objective will become to "Focus the Oculory". You will now have two objective markers, one pointing at the device in the center of the room and another at an elevated control console at the southeast part of the room. You can ask Paratus what to do next.
Focus is the Key[edit]
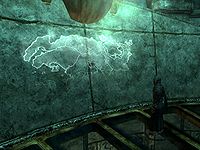
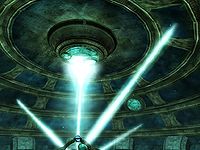
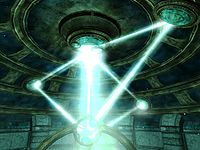
Paratus will indicate that you should direct some fire and frost spells onto the crystal to change the way that it bends the light beams projected by the device. If you look upward, you will see that the device receives one beam of light vertically, and splits it into three beams projected in various upward directions. The ultimate goal is to converge all of the beams into a pattern that will project an image on the wall below the control console.
| Puzzle Solution |
|---|
You may wish to save your game before taking the following steps:
When the Oculory is correctly focused, it will appear as shown. |
When the Oculory is correctly focused, Paratus will be initially excited, but then begin to exclaim with distress that there is something wrong. He will communicate that the map should show more, and speculate that there is some kind of interference coming from Winterhold. He may accuse you of attempting to stall his work and suspiciously ask if you knew what they are trying to do.
Talk to Paratus[edit]
Paratus will be looking at a map projected onto the wall under the control console. Speak to him and he will accuse you of trying to sabotage the Synod's efforts and demand that you explain yourself. Whatever the course of the ensuing conversation, Paratus will ask if—or assume that—you have something "powerful" at your college. He will be suspicious about this and toward you, stating that he will be reporting the information to the Synod Council. You'll learn that the Synod intended to use the device to scan the continent for powerful sources of magic, "for the good of the Empire". One way or another, Paratus will let you know that the map indicates that the Staff of Magnus is in Labyrinthian. You must now report this information to the Arch-Mage, Savos Aren.
Report to Savos Aren[edit]
You may now take a shortcut exit or return the long way back through the ruin. To take the shortcut, leave the room containing the Oculory. A short distance ahead, just past the barrels in the hallway, there is an exit door to the right. If you turn toward it, Nerien, the Psijic Order member who appeared to you in Saarthal, will visit you again. He will warn you that you will encounter difficulties ahead, but assure you that you are on the right path and that you will prevail. He will then urge you to return to the College immediately. You will not receive Nerien's visit if you leave through the main entrance, but this will not impact your progress through the quest.
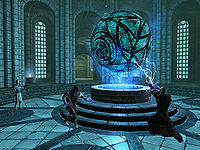
As you enter the Hall of the Elements, you'll find Arch-Mage Savos and Mirabelle in a panic. The gate to the room containing the Eye of Magnus is blocked by a barrier that Mirabelle speculates is some kind of ward, and the two of them implicate Ancano in possibly creating it. They will then begin casting Destruction spells at the barrier in an attempt to destroy it. If you speak to Savos, he will ask for your help in destroying the barrier, and say that they need to know what Ancano is doing in there. You can help break down the barrier with Destruction spells, but whether you do or not, the door will eventually open, and they will rush in. Savos will approach Ancano, who is casting a spell at the Eye, and command him to stop. Mirabelle will warn Savos not to go near Ancano, but Savos will begin casting a spell at him. At this point, all will go white, and the next thing you experience will be awakening in the Hall of the Elements with Mirabelle asking if you are all right and saying that she needs your help. When you reply that you think you feel well, this quest will complete and the next quest, Containment, will begin with the objective of finding the Arch-Mage, as Mirabelle requests of you.
Achievements[edit]
One achievement is unlocked when you complete this quest:
Bugs[edit]
- Sometimes Mirabelle is inaccessible. The quest pointer points to the courtyard but she is nowhere to be found.
- If you leave the Mzulft Aedrome after inserting the crystal in the armillary but before focusing the Oculory with the spells, it won't respond to them on your next visit, making the quest unsolvable; this may also occur if you save, quit and reload after placing the crystal.
- Mirabelle's second dialogue option in stage 99 may not advance the quest. Additionally, Mirabelle may be stuck on a rock outside the College wall; however, she can be accessed by jumping down toward her. ?
- If the beams of light do not show up after placing the crystal in the Oculory, try exiting out of the game and restarting.
- At the end of the ruin, when you are in the Oculory, Paratus will sometimes "be busy" or will not have any new dialogue after you tell him you have the focusing crystal and again after you align the lights. ?
- Leave the Oculory room and take the right corridor to an exit door to Skyrim. Go out the door and re-enter and try to talk to Paratus again in the Oculory. Either Paratus will respond with new dialogue or a quest message will appear stating the stage has been completed. The audio for the conversation about Labyrinthian may not play, but the follow-up stage to "go tell Savos Aren at Winterhold" will become active.
Sleeping just prior to adjusting the mirrors while having the Dark Brotherhood quest 'With Friends Like These...', active will automatically transport you to an abandoned shack in Hjaalmarch. After this, the mirrors will not adjust and pressing the buttons will not do anything. ?
- Reload a previous save and complete the Dark Brotherhood quest before continuing this one, or don't sleep until you complete the Oculory portion of this quest.
- Once you've cleared Mzulft Aedrome (final stage of the quest on "Reach the Oculory") there is a master-locked door at the bottom of the room, leading to a chest. It is possible to enter the top of the locked room and become stuck permanently, requiring you to reload your last save. ?
- The Mzulft map marker isn't added by the quest as the scripting for it wasn't set up properly, and Gavros will not be in the entrance to Mzulft to give you the key. Updating the game to a newer version will not solve the problem for existing saved games.
The Unofficial Skyrim Patch, version 1.0, fixes this bug.
- After returning from Mzulft, it is possible that none of Savos Aren's dialogue options will complete the objective "Report to Savos Aren" and give the next objective, "Reach Ancano". However, the scene continues and the quest completes as normal, but Containment (the next quest) never starts, rendering continuation of the College of Winterhold quest line impossible.
- After meeting Paratus and the journal entry changing to "Follow Paratus," he may not move and only repeat the previous dialogue asking who you are.
Kill him and resurrect him through console commands.
Go to the Oculory, then use the console command
"0007D41B".moveto player. This will teleport him to you where he will proceed with the quest.- Attack him and lure him to the Oculory, then use a Calm spell to get him out of combat and he will proceed with the quest.
- Speaking with Mirabelle and accidentally exiting conversation before she finishes talking about the Staff of Magnus will forever take that dialogue option away. ?
- Followers may be teleported inside the Hall of the Elements after Ancano knocks everyone unconscious, even if they have been told to wait elsewhere. If you do not tell them to follow you out of the hall before leaving the College, you will be unable to rejoin them until after completing the quest.
The Unofficial Skyrim Patch, version 2.0.5, fixes this bug.
If you went and worked on something else prior to finishing this quest, when you go to restart it and select the quest again the map marker doesn't show up anywhere or on the map. If you fast travel back to Mzulft and go inside the doors the marker will come back.
- This quest will not activate if you have already cleared Mzulft by using the platter trick, console command, etc. to enter the unpickable key-locked doors.
- Load a previous save from before Mzulft was cleared.
- For the sake of trophy/achievement hunting you can restart/reload and just do the questline only to unlock them, then return to your main file.
Quest Stages[edit]
| Revealing the Unseen (MG06) | ||
|---|---|---|
| Stage | Finishes Quest | Journal Entry |
| 10 | I've been asked to speak with Mirabelle Ervine to follow up on the Staff of Magnus.
Objective 10: Speak with Mirabelle Ervine
|
|
| 20 | Mirabelle has told me that members of the Synod recently visited the College, mentioning the Staff of Magnus. They were last known to be heading towards Mzulft; they may know more about where to find the staff.
Objective 20: Find the ruins of Mzulft
|
|
| 25 |
Objective 25: Search for Synod researchers
|
|
| 30 | At Mirabelle's suggestion, I entered the ruins of Mzulft searching for the Synod researchers. I found one man who died, and suggested that more people may be inside at something called The Oculory. I should head further into the ruins to see what's going on.
Objective 30: Reach the Oculory
|
|
| 32 | At Mirabelle's suggestion, I entered the ruins of Mzulft searching for the Synod researchers. I found Paratus Decimius, who appears to be the only surviving member of the Synod expedition, and who has insisted that a "focusing crystal" is necessary to finish his experiment but was stolen by the Falmer.
Objective 32: Find the Focusing Crystal
|
|
| 35 | Exploring Mzulft while looking for information about the Staff of Magnus, I've encountered Paratus Decimius, the sole surviving member of a Synod expedition. I've found the focusing crystal he needs to finish his experiment, and should return it to him.
Objective 35: Return the Crystal to Paratus
|
|
| 37 |
Objective 37: Follow Paratus
|
|
| 40 | Paratus Decimius may know the location of the Staff of Magnus, but has asked for my help in completing an experiment in Mzulft. I need to follow him to the top of the ruins.
Objective 40: Place the Crystal into the Oculory
|
|
| 50 | Paratus Decimius may know the location of the Staff of Magnus, but has asked for my help in completing an experiment in Mzulft. I need to use magic to attenuate Paratus' focusing crystal, and then manipulate the dwarven machinery to line up the beams of light.
Objective 50: Focus the Oculory
|
|
| 55 |
Objective 55: Talk to Paratus
|
|
| 60 | Traveling to Mzulft in search of the Synod, I found Paratus Decimius who helped me learn that the Staff of Magnus is located in Labyrinthian. This information needs to get back to Savos Aren at the College immediately.
Objective 60: Report to Savos Aren
|
|
| 70 | After traveling to Mzulft and learning that the Staff of Magnus is located within Labyrinthian, I returned to the College to give the news to Arch-Mage Aren. Aren, however, is more concerned with the Eye of Magnus at the moment, since Ancano has locked himself in the Hall of the Elements with it. I need to help the Arch-Mage reach him at once. | |
| 200 | After finding the Synod in Mzulft, I learned that the Staff of Magnus can be found in Labyrinthian, and brought this news to the Arch-Mage. | |
| Unknown |
Objective 70: Reach Ancano
|
|
- The following empty quest stages were omitted from the table: 0, 99.
- Any text displayed in angle brackets (e.g.,
<Alias=LocationHold>) is dynamically set by the Radiant Quest system, and will be filled in with the appropriate word(s) when seen in game. - Not all Journal Entries may appear in your journal; which entries appear and which entries do not depends on the manner in which the quest is done.
- Stages are not always in order of progress. This is usually the case with quests that have multiple possible outcomes or quests where certain tasks may be done in any order. Some stages may therefore repeat objectives seen in other stages.
- If an entry is marked as "Finishes Quest" it means the quest disappears from the Active Quest list, but you may still receive new entries for that quest.
- On the PC, it is possible to use the console to advance through the quest by entering
setstage MG06 stage, wherestageis the number of the stage you wish to complete. It is not possible to un-complete (i.e. go back) quest stages, but it is possible to clear all stages of the quest usingresetquest MG06.
| Prev: Good Intentions | Up: College of Winterhold | Next: Containment |

