Skyrim:Embershard Mine
|
|||
|---|---|---|---|
| # of Zones | 1 | ||
| Clearable | Yes | ||
| Dungeon | Yes | ||
| Respawn Time | 10 days or 30 days | ||
| Level | Range: 6-10 | ||
| Occupants | |||
| Bandits | |||
| Important Treasure | |||
| Light Armor Forging Spell Tome: Clairvoyance |
|||
| Console Location Code(s) | |||
| EmbershardMineExterior01, EmbershardMineExterior02, EmbershardMineExterior03, EmbershardMine01 | |||
| Region | |||
| Falkreath Hold | |||
| Location | |||
| Southwest of Riverwood North of Helgen |
|||
| Special Features | |||
| # of Forges/Anvils | 1 | ||
| # of Grindstones | 1 | ||
| # of Workbenches | 1 | ||
| # of Fishing SuppliesCC | 1 | ||
| # of Wood Chopping Blocks | 1 | ||
| # of Stone QuarriesHF | 1 | ||
| Ore Veins | |||
| # of Iron | 8 | ||
Embershard Mine is a small iron mine southwest of Riverwood containing bandits. It contains only one zone, Embershard Mine.
Related Quests[edit]
- Smith 'N SlashCC: Defeat an Orc blacksmith and her bandits to obtain an enchanted set of armor.
Radiant Quests[edit]
- Amulet of the Moon: Find the Moon Amulet for Kharjo.
- Bandit AttackHF: Rescue your beloved from kidnappers.
- Dungeon Delving: Do a favor by retrieving an item from a cave.
- Kill the Bandit Leader: Slay a bandit leader for Siddgeir, the Jarl of Falkreath.
- This location is one of many potential targets for one or more of the Radiant quests.
Walkthrough[edit]
Exterior[edit]
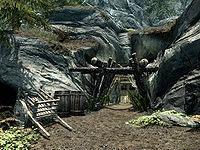
A slightly hidden path leads from the banks of the White River to the mine; the path is recognizable by the wooden slats leading up to it. As you approach the mine, a bandit will warn you to stay away, then rush to attack if you linger or continue to approach. A wooden cart, a wood chopping block, and a woodcutter's axe are by the barrels outside the entrance, with a beehive above and to the right of the entrance. With Hearthfire installed, a stone quarry is to the left of the entrance, just beside the wooden cart.
Embershard Mine[edit]
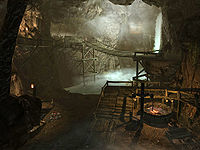
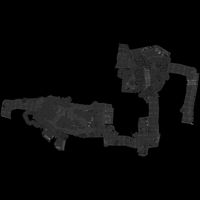
The mine itself is fairly well lit, but a light source will definitely come in handy, so you may want to grab some torches from the torch sconces scattered throughout to dim the area and aid in sneaking and to use for later exploring once the enemies are dispatched. There are ten samples of fly amanita to harvest throughout the mine. As you descend into the mine, there is a falling log trap that can do a fair amount of damage if you are low-level. The trigger for the trap is a tripwire across the dirt floor, so hop up onto the boards on the right of the tunnel to avoid the tripwire. The tunnel ends at a wooden walkway that crosses a large, mostly natural chamber. The walkway is suspended well over the ground below which is mostly covered by shallow water. Below this walkway to your right is a small beach where two bandits occupy a campsite with two unowned bedrolls. If you sneak in, you can overhear the two bandits mentioning the guard outside and the trap. If you remain hidden after this discussion, one of the bandits will lie down on a bedroll, and the other will take the ramp from the campsite up to the end of the walkway opposite the entrance and then go through the tunnel on the far side of the chamber to a platform where he will stand, facing the entrance tunnel. There is a pickaxe near the campsite's campfire in case you need one to start mining iron ore. The tunnel that leads to the platform intersects with a dead-end, collapsed tunnel section where you will find a coin purse and a tattered journal. The platform holds a food barrel, a shelving unit, a small table and chair, and a lever which will lower a drawbridge to form a T-intersection with the wooden walkway. If the two bandits from the campsite have been killed, lowering the drawbridge alerts two more bandits who will come to investigate. If you remain hidden, they will split up with one heading for the platform and the other checking the entrance tunnel.
Across the lowered drawbridge is a dark tunnel. Just before the tunnel, a coin purse sits on a beam overhead. It can be snagged manually with a little careful maneuvering, knocked down with an arrow or spell, or, with some luck, you can activate the lever to raise the bridge, and then attempt to cross it as it rises; it will propel you upwards and place you atop the entrance to the dark tunnel. You might want to quicksave before knocking down the coin purse in case it gets lost in the water below. Moving forward into the tunnel, you will pass a partially boarded opening in the right wall. A small opening in the boards acts as a window to a treasure room. Around the corner, a bandit sits on a chair outside the locked door to the treasure room. This bandit carries the Embershard Mine key which opens both the treasure room and the prison cell opposite. The treasure room contains a boss chest, several sacks, a weapon rack that holds an iron greatsword and an iron warhammer, two alchemy barrels, and a small table. A Spell Tome: Clairvoyance, an iron dagger, and a coin purse sit on top of the table.
Deeper into the mine, the tunnel opens onto a ledge on the eastern wall of an even larger chamber. The eastern ledge holds two alcoves, one of which contains three unowned bedrolls, a small table, and a chair. The other alcove contains nothing but a bucket set into a wooden floor. From this eastern ledge, wooden ramps on the north and south walls lead down to the blacksmith area below, which contains a forge, a grindstone, a workbench, a weapon rack that holds an iron sword and an iron greatsword, and a table. There are two iron ingots on the workbench, and there are two pieces of iron ore and a copy of the Smithing skill book Light Armor Forging on the table. A wooden walkway on the south side of the chamber leads to a southern ledge that appears to be the main dining area and pantry. The dining area contains three tables - two with chairs, a shelving unit, a brazier with some grilled leeks and baked potatoes on top, and a couple of sacks. The pantry has some large shelves and contains numerous sacks, two food barrels, a table, and a chest. A coin purse, several loose coins, and a few gems sit on the table. A tunnel in the west wall of the dining area leads to a smaller ledge with another coin purse and a novice-locked chest nestled next to the waterfall. From the dining area ledge, another suspended wooden walkway spans the chamber to a walkway on the northern wall. This walkway, part earthen and part wood, leads to the highest ledge which is on the west side of the chamber. This area is rigged with bone chimes and has an exit back outside just southwest of Riverwood. There are three more bandits in this chamber. One is working the forge, a two-handed warrior is seated in the dining area, and an archer patrols the suspended wooden walkway and the western ledge with the bone chimes. The bottom floor of the chamber is mostly covered by water. With the Fishing Creation installed, some Fishing Supplies can be found here, and fish from Underground waters can be caught.
Notes[edit]
- Iron ore veins are found in the following locations:
- Next to the first campfire after you first descend into the mine.
- At the first intersection, between the collapsed tunnel and the bridge lever room.
- At the bottom of the tunnel just after the bridge, next to a wood pile.
- Just past the jail cell, behind boards that appear to be supporting the wall.
- Just past the jail cell, next to a wood pile in the corridor.
- At the bottom level of the large room, under the walkway between the water and the forge.
- In the middle level of the large room, next to the waterfall accessed via the path behind the kitchen.
- On the path from the top level of the large room, next to a bone rattle alarm just before the unmarked exit near Riverwood.
- In addition to the above eight veins inside the mine, two more are outside the mine, a short distance northwest of the unmarked exit.
- Entering from the unmarked exit may result in the two bandits behind - now in front - of the lever-controlled bridge not spawning. It appears the trigger for the two bandits to spawn is the act of lowering the bridge from the side nearer the main entrance.
- If the two bandits in the first chamber are alive or reanimated when the bridge is lowered, the two bandits that usually spawn and run across it will not spawn.
- Unlike most bandit hideouts, there is no Bandit Chief in this dungeon, even if you have a bounty quest requiring you to kill the leader of the mine. The leader will instead usually be a normal bandit, or on rare occasions, a Bandit Outlaw. This may be due to the fact that this dungeon is one of the few that has a maximum level as well as a minimum level.
Maps[edit]
- Skyrim-Places-Mines
- Skyrim-Places
- Skyrim-Places-Level 6-10
- Skyrim-Places-Falkreath Hold
- Skyrim-Places-Iron Veins
- Skyrim-Places-Forges
- Skyrim-Places-Grindstones
- Skyrim-Places-Workbenches
- Skyrim-Places-Fishing Supplies
- Skyrim-Places-Stone Quarries
- Skyrim-Places-Clearable
- Skyrim-Places-Discoverable
- Skyrim-Places-Bandit Camps


