Online:Proving the Deed
| This page is currently being rewritten as part of the Online Quest Project. The page is being both written and checked. All users are welcome to make changes to the page. If you make a change that is relevant to the project, please update this template accordingly, and make sure you have observed the project guidelines. Detail Quick Summary: not written
Quest Stages: not written |
|
Quick Walkthrough[edit]
- Talk to Merric at-Aswala at the Fighters Guild in Vulkwasten (Malabal Tor), Sentinel (Alik'r,take the stairway next to Jofnir's Quarters to get to her), or Fort Amol (Eastmarch).
- Find Aelif and investigate Jofnir's Quarters.
- (Optional) Talk to Fighters Guild members in Baandari Trading Post (Malabal Tor), Bergama (Alik'r), or Windhelm (Eastmarch).
- Meet Aelif and travel to Ragnthar.
- Dispel the barrier.
- Examine the remains.
- Witness the testimony.
- Return to Merric at the Guildhall.
Detailed Walkthrough[edit]
When you have reached Fighters Guild Rank 4 and are near the Guildhall in any city, a courier will run up to you. You need to talk to the courier to begin the quest. Merric at-Aswala asks you to meet him in the Fighters Guild. The investigation into Jofnir Iceblade's death is beginning.
Talk to Merric. The strange people around him are the Council of Province Generals, who run the guild under the guildmaster's supervision. They feel you and Aelif need to investigate Jofnir's death. He sends you to talk to Aelif outside.
Your first step is to investigate Jofnir's quarters.
Searching for Clues[edit]
Inside Jofnir's house, there are a few items you can examine:
- A Soul Gem
- <This Soul Gem is dark, empty. It still carries smears of encrusted dust, hinting at its age.>
- A Dwarven Gear
- <This gear resembles the ones from Mzeneldt. It shows signs of having been recently cleaned. You can make out inscriptions around the central wheel, but you don't recognize the language.>
- A Backpack
- <This backpack is filled with Dwarven artifacts: gears, struts, and other unrecognizable parts. You catch a glimpse of soul gem fragments at the bottom of the pack.>
While these hint at his hobby of delving into Dwemer ruins, the real prized is Jofnir's Journal. He mentions that he was going to visit Ragnthar and that he "couldn't let [it] go on any longer."
Tell Aelif what you found. The journal mentions Jofnir stopped at a minor city to pick up supplies before heading to Ragnthar. You agree to meet Aelif there.
Question Fighters Guild Members[edit]
This is an optional part of the quest. You can find Provost Riud inside the Guild Hall in Bergama. He wonders what Jofnir would think of the guild fighting Daedra and Dark Anchors. Armory Sergeant Cayliss can be found outside, on the upper level of the Guild Hall. She says Jofnir visited often in the months before he died. Akhita is sitting near the edge of the roof. The former guild master had her set out supplies for his expeditions to Ragnthar, an old Dwemer ruin. The ruin exists outside of time and space, according to some mages.
To Ragnthar[edit]
If you are in the Aldmeri Dominion, you need to meet Aelif north of Baandari Trading Post; this is northeast of Vulkwasten. If you are in the Daggerfall Covenant, meet Aelif on the bridge at Ogre's Bluff, east of Bergama. If you are in the Ebonheart Pact, meet Aelif near Windhelm.
Talk to Aelif, then follow her to Ragnthar. Talk to Aelif after you two find the door. Aelif will use her magical skills to focus the door and allow both of you to enter.
The mist around the door clears and you enter Ragnthar.
 Ragnthar's Secret[edit]
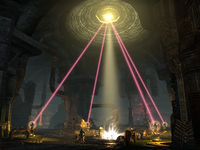
Head east into the large room, and try to search the skeletal remains in its center. When you approach, you are thrown back, and the skeleton is shrouded in golden light from four crystals.
Talk to Aelif. She knows a spell to negate the barrier. Wait for her to cast the spell, then destroy each of the four crystals. You have a short time to do this, but you can always start again by asking her to cast the spell again--although the crystals reset. There is no order to destroy them in; just run up and activate them.
Examine the skeletal remains after the barrier is down. They are the bones of a Nord, and there is a guild insignia in its ribcage. You take the insignia and hear a strange noise. It's a trap. Defeat the enemies, then talk to Aelif.
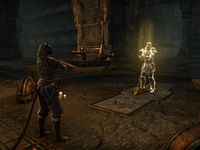
She says the insignia belonged to Jofnir. Aelif will try to summon Jofnir's spirit, now that the barrier keeping him in is gone, so he can tell you himself what happened.
Jofnir Iceblade's Testimony[edit]
- "Aelif demands the name of your murderer. Who killed you, Jofnir?"
- "It was the Argonian, my subordinate, Sees-All-Colors."
Talk to Aelif. She tells you to find Merric and the council. They need to know about this.
Return to the Fighters guildhall where you talked to Merric at the beginning of this quest. He is shocked that Aelif would use necromancy and dark magic, but this is the evidence the council needed. He asks you to keep in touch and gives you Aelif's Shadowband and some gold.
Notes[edit]
- When you follow Aelif she will keep moving forward even if you get attacked by an enemy.
Quest Stages[edit]
| Proving the Deed | |
|---|---|
| Finishes Quest | Journal Entry |
Objective: Talk to Merric | |
Objective: Talk to Aelif | |
Hidden Objective: Examine Soul Gem | |
Hidden Objective: Examine Gear | |
Hidden Objective: Examine Pack | |
Objective: Search Jofnir's Quarters | |
Objective: Report to Aelif | |
Hidden Objective: Talk to Provost Riud | |
Objective: Talk to Fighters Guild Members | |
Hidden Objective: Talk to Armory Sergeant Cayliss | |
Hidden Objective: Talk to Akhita | |
Objective: Meet Aelif to travel to Ragnthar | |
Hidden Objective: Follow Aelif to Ragnthar | |
Objective: Wait for Aelif to bring down the barrier | |
Objective: Enter Ragnthar | |
Objective: Search Ragnthar for Clues | |
Objective: Wait for Aelif to Cast Her Spell | |
Objective: Destroy the Crystals | |
Objective: Examine the Body | |
Objective: Discover the Source of the Noise | |
Objective: Survive the Trap | |
Objective: Witness Jofnir Iceblade's Testimony | |
Objective: Talk to Merric at-Aswala | |
<Alias=LocationHold>) is dynamically set by the game and will be filled in with the appropriate word(s) when seen in game.
- Not all Journal Entries may appear in your journal; which entries appear and which entries do not depends on the manner in which the quest is done.
- Stages are not always in order of progress. This is usually the case with quests that have multiple possible outcomes or quests where certain tasks may be done in any order. Some stages may therefore repeat objectives seen in other stages.

