Oblivion:Random Oblivion World 1
| Oblivion World: Random Oblivion World 1 (lore page) | |
|---|---|
| # of Peripheral Towers | 2 |
| # of Non-Random Caves | 1 |
| Important Treasure | |
| |
| Console Location Code | |
| Worldspace: OblivionRD001 OblivionRD001Caves OblivionRD001Tower01 OblivionRD001Tower02 | |
| Fixed Gate | |
| Gate outside Bravil (map) (after Dagon Shrine has been completed) | |
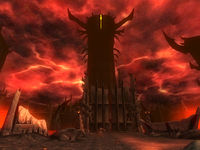
Random Oblivion World 1 is a medium-sized World, and one of seven randomly chosen Oblivion Worlds.
The Oblivion Gate in front of Bravil always connects to this world.
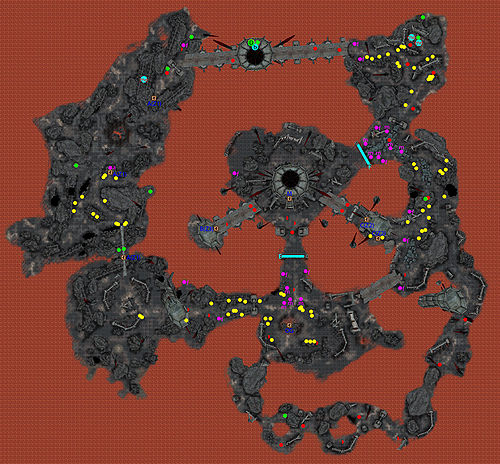
When you step out of the gate the main tower is directly in front of you. However, a War Gate prevents you from taking the direct route to the tower. The normal route is to find your way to the Spindle Shrine and activate the gate controls at the top of that tower or pass through the Caverns of the Abused and the Blood Well. If you have a good combination of health and speed, however, you can go through the lava on the sides of the War Gate. With proper timing it is also possible to jump on top of the base of the War Gate and avoid landing in the lava altogether. There will be two enemies on the other side of the gate when you emerge.
If you take the time to explore more of this world, you will find a fair number of Fleshy Pods with loot. The most notable is a boss-level Fleshy Pod, found at the north end of the world on a platform that appears to be the top of a submerged tower.
Exterior[edit]
The western tower is the Blood Well and is part of the slightly shorter route. Head west then north, (clockwise around the loop of islands that makes up most of this world), passing a tilted and inaccessible tower, and then crossing over a narrow bridge. A short ways after the bridge is an entrance to the Caverns of the Abused. If you take this route, it is not compulsory to go through the Caverns; a quicker alternative is to climb over the small mountain to the left of the cavern entrance, avoiding the flaming crater at the summit.
Another option is to jump off the southern side of the bridge, which will place you in an area with two Fleshy Pod Sacks. Be careful not to fall into the lava. It is very hard to climb onto the bridge from this point, but directly to the west is another entrance to the Caverns of the Abused, which provides direct access to the Blood Well via a door directly to the right of the entrance.
The third option is to go through the eastern tower, the Spindle Shrine. To get there you actually need to start by going southwest from the Oblivion Gate, which starts you on a chain of islands that eventually lead you counterclockwise to the tower. Along the way you will pass another dysfunctional tilted tower. Eventually you will reach the Spindle Shrine.
The fourth option for reaching the main tower is to just go around the closed War Gate by jumping into the lava for a moment. If timed and done properly you can sustain minimum damage, although you need be prepared to immediately take on one or more random Daedra and be under fire from several Fire Turret traps. It's worth noting that the path to the right on the east side of the War Gate through the lava is slightly shorter than the left-hand path.
The Sigil Keep is a randomly selected tower from one of the 5 possible presets.
Occupants:
Treasure:
- 1 boss-level Fleshy Pod Sack01 at location D on map
- 5 Fleshy Pod Ext
- 4 Fleshy Pod Bag
- 2 Fleshy Pod Sack
Plants:
- Plants are marked by yellow dots on map
- 47 Blood Grass plants
- 16 Harrada plants
- 13 Spiddal Stick plants
Traps:
- 1 Avalanche trap at location a on map
- 14 Fire Turret traps at f
- 10 Land Mine traps at m
Doors and Gates:
- There are 8 doors leading in/out of this zone
- 1 Oblivion Gate (at OG) leads to Tamriel
- 3 doors (at A) lead to the zone Caverns of the Abused (Z1)
- 1 door (at B) leads to the zone Blood Well (Z3)
- 2 doors (at C) lead to the zone Spindle Shrine (Z2)
- 1 door (at M) leads to a random Sigil Keep
Other:
- 1 War Gate at location E on map
- 1 War Gate at F
- 1 Blood Fountain at b
- 3 Magicka Essences at me
Caverns of the Abused[edit]
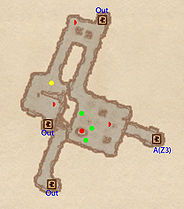
These caverns are bit more complicated than what you might expect. If you crossed the bridge to the south of the entrance, you will enter the cave at the western entrance, at the highest point. Work your way further from there. The first exit you'll pass leads you back outside, to the northernmost entrance.
You can also opt to continue and drop down through the hole in the ground. There are three Fleshy Pods to be found here. You can then choose from one of the two exits. The southernmost exit will lead to a partly hidden area of the Wastes of Oblivion. There you can find two more Fleshy Pods, but it's difficult to climb higher from that point. The eastern exit of the caves will not lead outside but will lead to the Blood Well instead.
Occupants:
Treasure:
Plants:
- Plants are marked by yellow dots on map
- 1 Harrada plant
Doors and Gates:
- There are 4 doors leading in/out of this zone
- 1 door (at A) leads to the zone Blood Well (Z3)
- 3 doors (at Out) lead outside
Spindle Shrine[edit]
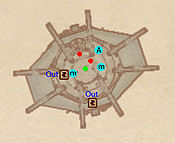
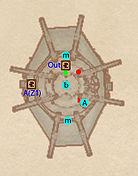
If you climb to the top of this tower you will be able to use the controls found there to open all War Gates outside. Apart from those controls you can also find one The Punished at the top of the tower. Halfway is an exit that leads to a bridge to the Sigil Keep. The bridge is broken though, and it's quite impossible to reach the Sigil Keep from there.
Occupants:
Treasure:
Doors and Gates:
- There are 2 doors leading in/out of this zone
- 2 doors (at Out) lead outside
Other:
- 1 Gate Control lever at location A on map (opens all War Gates outside)
- 2 Magicka Essences at m
Blood Well[edit]
At the bottom of this tower is the door leading to the Caverns of the Abused. You can use the Corpse Masher to reach the middle section of the tower. The exit found there will lead you outside to the bridge to the Sigil Keep. You can climb to the top of the tower if you want to check out The Punished there, as well as the controls that can open all War Gates outside.
Occupants:
Treasure:
Doors and Gates:
- There are 2 doors leading in/out of this zone
- 1 door (at A) leads to the zone Caverns of the Abused (Z1)
- 1 door (at Out) leads outside
Other:
- 1 Gate Control lever at location A on map (opens all War Gates outside)
- 1 Blood Fountain at b
- 2 Magicka Essences at m
